
serverResolutions について Class Documents を訳してみました。
serverResolutions {Array}
A list of all resolutions available on the server. Only set this property if the map resolutions differs from the server.
サーバー上で利用可能なすべての解像度のリストです。地図の解像度がサーバーと異なるとき、このプロパティを設定します。
また、Tolecache ホームページの
Using TileCache With OpenLayers
http://tilecache.org/docs/README#using-tilecache-with-openlayers
も訳してみました。
Using TileCache With OpenLayers
To run OpenLayers with TileCache the URL passed to the OpenLayers.Layer.WMS constructor must point to the TileCache script, i.e. tilecache.cgi or tilecache.py. As an example see the index.html file included in the TileCache distribution.
TileCacheを使ってOpenLayersを実行するために、OpenLayers.Layer.WMSのコンストラクタに渡したURLは、TileCacheスクリプト、すなわち、tilecache.cgiまたはtilecache.pyを指定しなければなりません。例として、TileCache ディストリビューションに含まれている index.html ファイル参照してください。
Note: index.html assumes TileCache is set up under CGI (see above). If you set up TileCache under mod_python you’d need to slighly modify index.html: the URL passed to the OpenLayers.Layer.WMS constructor must point to the mod_python script as opposed to the CGI script, so replace tilecache.cgi with tilecache.py. Similarly, you would need to edit this URL if you were to use TileCache with the standalone HTTP Server or FastCGI.
注:TileCache を mod_python に設定しているなら,少し index.htmlを変更する必要があります。:OpenLayers.Layer.WMS コンストラクタに渡た URL は、CGI スクリプトに対して mod_python スクリプトを指定しなければなりません。それで、tilecache.py とともに tilecache.cgi を置き換えます。同じように、TileCacheをスタンドアロンの HTTP Server または FastCGI とともに使用した場合には、この URL を編集する必要があります。
The most important thing to do is to ensure that the OpenLayers Layer has the same resolutions and bounding box as your TileCache layer. You can define the resolutions in OpenLayers via the ‘resolutions’ option or the ‘maxResolution’ option on the layer. The maxExtent should be defined to match the bbox parameter of the TileCache layer.
実行ための最も重要なことは、OpenLayers レイヤが TileCache と同じ解像度とバウンディングボックスだということを確認することです。あなたは、レイヤの'resolution'オプションまたは'maxResolution'オプションを介して、OpenLayersの解像度を定義することができます。 maxExtent は、TileCache レイヤの bbox パラメータと一致するように定義する必要があります。
If you are using TileCache for overlays, you should set the ‘reproject’ option on the layer to ‘false’.
オーバーレイとして TileCache を使用している場合は、レイヤー上の 'reproject' オプションを 'false' に設定する必要があります。
2009年12月1日火曜日

2009年11月30日月曜日
OpenLayers 35a タイルキャッシュの表示 - TileCache
OpenLayers Tile Cache Example(tilecache.html)を参考に タイルキャッシュを表示しようとしましたができなかったので、TileCache で地図を表示することを試してみました。
を参考に TileCache 使ってみました。
TileCache は OpenLayers と一緒に使うように設計され、地図のタイル画像を保存し、WMS サーバと同様の動作をします。
TileCache は Python CGI スクリプトで動作し、MetaCarta によって BSD ライセンスで配布されています。
に沿って設定してみます。
インストール
Debian では、Synaptic パッケージマネージャでインストールします。
「tilecache」で検索してください。
CGI で操作する
Debian ではこのままで動作しますが、使い方を一通りみてみます。
/etc/tilecache.cfg に タイルをキャッシュ(蓄積)する DiskCache の場所やマップファイルまたは WMS サーバのレイヤのキャッシュの場所を指定します。
今は何もしません。
TileCache ディレクトリで CGI を実行できるように設定します。
Debian では、/usr/lib/cgi-bin になります。
次のアドレスを Web ブラウザに入力します。
または
次の画像が表示されれば設定が完了しています。
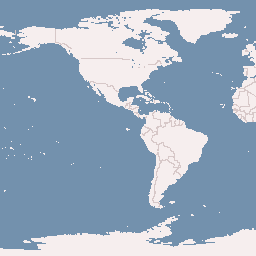
画像表示後に tilecache.cfg で設定した場所にキャッシュ(画像)が保存されます。
次のように保存されていました。
実際に設定してみました。
/etc/tilecache.cfg につぎのように追加します。
次のアドレスを Web ブラウザに入力します。
エラー1: 次のようなエラーが表示されたので、'mapfile' の行をコメントアウトしました。
エラー2: 次のようなエラーが表示されたので、'resolutions' の行を追加しました。
((-185000 - (-279000))/256 = 367.1875 のことです。なぜ経度(X 方向)なのかは分かりません。)
エラー3: 次のようなエラーが表示されたので、'url' の行を修正しました。
エラー4? 何も表示されない画像(キャッシュ)が生成されました。
あらかじめ作成しておいた tilecache 用のコードを Webブラウザ(Firefox- Eclipse のプレビュー(デフォルトタブ)では表示されません)で表示させましたが、やはり何も表示されません。
拡大ボタン + をクリックしたら地図が表示されました。
それで、つぎのようにコードを修正したら表示できるようになりました。
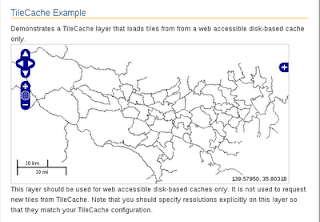
tilecache.cfg の設定
tilecache 用のコードを作成します。(OpenLayers.Layer.WMS を使用する方法)
HTML ファイルを新規作成します。
「openlayersTokyoproj」 を右クリックして 新規 -> HTML ファイル をクリック。
「HTML ファイル」ウィンドウの「ファイル名(任意:openlayers_tilecache.html)」に入力して「完了」ボタンをクリック。
「charset」を「utf-8」にします。
「/usr/share/doc/tilecache/examples/cgi-example.html」を Eclipse にインポートし、開いて内容をコピーして新規作成したファイルに貼り付けます。
コードの修正とちょっと解説します。
<!-- Split Feature コード -->
/**
* For images that don't exist in the cache, you can display
* a default image - one that looks like water for example.
* To show nothing at all, leave the following lines commented out.
*/
TileCache ホームページ
http://tilecache.org/
を参考に TileCache 使ってみました。
TileCache は OpenLayers と一緒に使うように設計され、地図のタイル画像を保存し、WMS サーバと同様の動作をします。
TileCache は Python CGI スクリプトで動作し、MetaCarta によって BSD ライセンスで配布されています。
Getting Started
http://tilecache.org/docs/README
に沿って設定してみます。
インストール
Debian では、Synaptic パッケージマネージャでインストールします。
「tilecache」で検索してください。
CGI で操作する
Debian ではこのままで動作しますが、使い方を一通りみてみます。
/etc/tilecache.cfg に タイルをキャッシュ(蓄積)する DiskCache の場所やマップファイルまたは WMS サーバのレイヤのキャッシュの場所を指定します。
今は何もしません。
TileCache ディレクトリで CGI を実行できるように設定します。
Debian では、/usr/lib/cgi-bin になります。
次のアドレスを Web ブラウザに入力します。
http://localhost/cgi-bin/tilecache.cgi?LAYERS=basic&SERVICE=WMS &VERSION=1.1.1&REQUEST=GetMap&SRS=EPSG:4326&BBOX=-180,-90,0,90 &WIDTH=256&HEIGHT=256
または
http://localhost/cgi-bin/tilecache.cgi/1.0.0/basic/0/0/0.png
次の画像が表示されれば設定が完了しています。

画像表示後に tilecache.cfg で設定した場所にキャッシュ(画像)が保存されます。
---
[cache]
type=Disk
base=/tmp/tilecache
---
次のように保存されていました。
user@debian:~$ ls /tmp/tilecache/basic/00/000/000/000/000/000/000.png
実際に設定してみました。
/etc/tilecache.cfg につぎのように追加します。
---
[kukaku]
type=WMSLayer
mapfile=/home/user/mapfile/tokyo_pgis.map
url=http://192.168.1.6/cgi-bin/mapserv
layers=kukaku
bbox=-279000,1054000,-185000,1104000
srs=EPSG:2456
---
次のアドレスを Web ブラウザに入力します。
http://localhost/cgi-bin/tilecache.cgi?LAYERS=kukaku&SERVICE=WMS &VERSION=1.1.1&REQUEST=GetMap&SRS=EPSG:2456&BBOX=-279000,1054000,-185000,1104000 &WIDTH=256&HEIGHT=256
エラー1: 次のようなエラーが表示されたので、'mapfile' の行をコメントアウトしました。
An error occurred: __init__() got an unexpected keyword argument 'mapfile'
エラー2: 次のようなエラーが表示されたので、'resolutions' の行を追加しました。
An error occurred: can't find resolution index for 367.187500. Available resolutions are:
[183.59375,...
---
resolutions=367.187500,183.593750,91.796875,45.898438,22.949219,11.474609,5.737305,2.868652,1.434326,0.717163,0.358582,0.179291
---
((-185000 - (-279000))/256 = 367.1875 のことです。なぜ経度(X 方向)なのかは分かりません。)
エラー3: 次のようなエラーが表示されたので、'url' の行を修正しました。
An error occurred: Did not get image data back.
URL: http://localhost/cgi-bin/mapserv?layers=kukaku&styles=&service=WMS&width=256&format=image%2Fpng&request=GetMap&height=256&srs=EPSG%3A2456&version=1.1.1&bbox=-279000.0%2C1054000.0%2C-185000.0%2C1148000.0
Content-Type Header: text/html
Response:
<HTML>
<HEAD><TITLE>MapServer Message</TITLE></HEAD>
<!-- MapServer version 5.0.3 OUTPUT=GIF ...
<BODY BGCOLOR="#FFFFFF">
loadMap(): Web application error. CGI variable "map" is not set.
---
---
url=http://localhost/cgi-bin/mapserv?map=/home/user/mapfile/tokyo_bmi_pgis_img.map
---
エラー4? 何も表示されない画像(キャッシュ)が生成されました。
あらかじめ作成しておいた tilecache 用のコードを Webブラウザ(Firefox- Eclipse のプレビュー(デフォルトタブ)では表示されません)で表示させましたが、やはり何も表示されません。
拡大ボタン + をクリックしたら地図が表示されました。
それで、つぎのようにコードを修正したら表示できるようになりました。
---
map = new OpenLayers.Map( $('map'), {
 projection: new OpenLayers.Projection("EPSG:2456"),
 displayProjection: new OpenLayers.Projection("EPSG:4326"),
// maxResolution: 'auto',
 resolutions: [
   183.593750,91.796875,45.898438,22.949219,11.474609,5.737305,2.868652,1.434326,0.717163,0.358582,0.179291
 ],
 units: 'meters',
 maxExtent: new OpenLayers.Bounds(-279000,1054000,-185000,1104000)
});
---

tilecache.cfg の設定
---
[kukaku]
type=WMS
url=http://192.168.1.6/cgi-bin/mapserv?map=/home/user/mapfile/tokyo_bmi_pgis_img.map
layers=kukaku
bbox=-279000,1054000,-185000,1104000
srs=EPSG:2456
resolutions=367.187500,183.593750,91.796875,45.898438,22.949219,11.474609,5.737305,2.868652,1.434326,0.717163,0.358582,0.179291
---
tilecache 用のコードを作成します。(OpenLayers.Layer.WMS を使用する方法)
HTML ファイルを新規作成します。
「openlayersTokyoproj」 を右クリックして 新規 -> HTML ファイル をクリック。
「HTML ファイル」ウィンドウの「ファイル名(任意:openlayers_tilecache.html)」に入力して「完了」ボタンをクリック。
「charset」を「utf-8」にします。
「/usr/share/doc/tilecache/examples/cgi-example.html」を Eclipse にインポートし、開いて内容をコピーして新規作成したファイルに貼り付けます。
コードの修正とちょっと解説します。
<html xmlns="http://www.w3.org/1999/xhtml">
 <head>
  <meta http-equiv="Content-Type" content="text/html; charset=utf-8">
  <title>OpenLayers35 TileCache</title>
  <link rel="stylesheet" href="./theme/default/style.css" type="text/css" />
  <link rel="stylesheet" href="./examples/style.css" type="text/css" />

<!-- OpenLayers ライブラリ -->
  <script src="./lib/Firebug/firebug.js"></script>
  <script src="./lib/OpenLayers.js"></script>

<!-- Proj4js ライブラリ -->
  <script type="text/javascript" src="./lib/proj4js/lib/proj4js-compressed.js"></script>
  <script type="text/javascript" src="./lib/proj4js/lib/projCode/tmerc.js"></script>
  <script type="text/javascript" src="./lib/proj4js/lib/defs/EPSG2456.js"></script>
<!-- Split Feature コード -->
  <script type="text/javascript">
   var map, layer;
   function init(){
//  東京都用 map の設定
    map = new OpenLayers.Map( $('map'), {
     projection: new OpenLayers.Projection("EPSG:2456"),
     displayProjection: new OpenLayers.Projection("EPSG:4326"),
     resolutions: [ // tilecache.cfg と同じ設定値
      183.593750,91.796875,45.898438,22.949219,11.474609,5.737305,2.868652,1.434326,0.717163,0.358582,0.179291
     ],
     units: 'meters',
     maxExtent: new OpenLayers.Bounds(-279000,1054000,-185000,1104000)  // tilecache.cfg と同じ設定値
    });
// ここまで
// 東京都区画レイヤ
    layer = new OpenLayers.Layer.WMS( "BMI Kukaku",
     "/cgi-bin/tilecache.cgi?",
     {
      layers: 'kukaku',
      format: 'image/png'
//    serverResolutions: [ 367.187500,183.593750,...] 削除
     }
    );
    map.addLayer(layer);
//  map.setCenter(new OpenLayers.LonLat(0, 0), 0);
    if (!map.getCenter()) map.zoomToMaxExtent();
    map.addControl(new OpenLayers.Control.LayerSwitcher()); // 追加
    map.addControl(new OpenLayers.Control.MousePosition()); // 追加
    map.addControl(new OpenLayers.Control.ScaleLine());     // 追加
// ここまで
   } End of init()

   OpenLayers.Util.onImageLoadError = function() {
/**
* For images that don't exist in the cache, you can display
* a default image - one that looks like water for example.
* To show nothing at all, leave the following lines commented out.
*/
   //this.src = "../img/blank.gif";
   //this.style.display = "";
   };
  </script>
 </head>
<!-- body 部分 -->
 <body onload="init()">
  <h1 id="title">TileCache Example</h1>
  <div id="tags"></div>
  <p id="shortdesc">
   Demonstrates a TileCache layer that loads tiles from from a web
   accessible disk-based cache only.
  </p>
  <div id="map" class="smallmap"></div>
  <div id="docs">
   This layer should be used for web accessible disk-based caches only. It is not used to request new tiles from TileCache.  Note that you should specify resolutions explicitly on this layer so that they match your TileCache configuration.
  </div>
 </body>
</html>
登録:
投稿 (Atom)