「Tile Transitions(tile-transitions.html)」を参考に地図を表示してみます。
説明に次のようにあります。
By default tiles are rendered with an opacity transition - fading in over 250 ms. To disable this behavior, set the transition option of the tile source to 0.
デフォルトでは、タイルは不透明なトランジションでレンダリングされます。フェーディングは250ミリ秒を超えます。 この動作を無効にするには、タイルソースのトランジションオプションを0に設定します。
HTML ファイルの作成
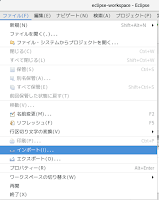
a Eclipse のメニューの「ファイル」->「ファイルを開く」をクリックします。

b 「ファイルを開く」ウィンドウで、「user」->「public_html」->「eclipse-workspace」->「ol4proj」-> 「v4.4.1」->「examples」->「tile-transitions.html」をクリックして選択し、「OK」ボタンをクリッ クします。
同じように「tile-transitions.js」を開きます。
(この状態でファイル名をキーボードで打つと検索欄が表示されて候補が絞り込めます。)
c メニューの「ファイル」->「新規」->「ファイル」をクリックします。

d 「ファイル」ウィンドウで「ol4proj」->「v4.4.1」->「examples」をクリックして選択し、「ファイル名」を「2173-ol4ex.html」と入力し、「完了」ボタンをクリックします。
(「ファイル」->「新規」->「その他」をクリックし、「ウィザードを選択」ダイアログで「Web」->「HTMLファイル」からテンプレートも作成できます。)
e 「tile-transitions.html」の内容をコピーして「2173-ol4ex.html」に貼り付け、修正します。
f 同じように、新規に「2173-ol4ex.js」ファイルを作成し、「tile-transitions.js」の内容をコピーして貼り付け、修正します。「tile-transitions-require.js」も「2173-ol4ex-require.js」に貼り付けます。
(「ファイル」->「新規」->「JavaScript ソース・ファイル」をクリックし、「新規 JavaScript ファイル」ダイアログでテンプレートも作成できます。)
「2173-ol3ex.html」
<!DOCTYPE html>
<html lang="en-US">
 <head>
  <meta charset="utf-8">
  <meta http-equiv="X-UA-Compatible" content="IE=Edge">
  <meta name="viewport" content="initial-scale=1.0, user-scalable=no, width=device-width">
  <link rel="stylesheet" href="http://maxcdn.bootstrapcdn.com/font-awesome/4.4.0/css/font-awesome.min.css" type="text/css">
  <link rel="stylesheet" href="http://maxcdn.bootstrapcdn.com/bootstrap/3.3.6/css/bootstrap.min.css" type="text/css">
  <link rel="stylesheet" href="./resources/prism/prism.css" type="text/css">
  <link rel="stylesheet" href="../css/ol.css" type="text/css">
  <link rel="stylesheet" href="./resources/layout.css" type="text/css">

  <script src="https://cdn.polyfill.io/v2/polyfill.min.js?features=fetch,requestAnimationFrame,Element.prototype.classList,URL"></script>
  <script src="./resources/zeroclipboard/ZeroClipboard.min.js"></script>
  <title>Tile Transitions</title>
 </head>
 <body>
  <!--
  bootstrap-combined.min.css, ol.css, layout.css,
  CSSファイルで設定されたセレクタを使用。
  -->
  <header class="navbar" role="navigation">
   <div class="container">
    <div class="display-table pull-left" id="navbar-logo-container">
     <a class="navbar-brand" href="./"><img src="./resources/logo-70x70.png"> OpenLayers Examples</a>
    </div>
    <!-- menu items that get hidden below 768px width -->
    <nav class='collapse navbar-collapse navbar-responsive-collapse'>
     <ul class="nav navbar-nav pull-right">
      <li><a href="../doc">Docs</a></li>
      <li><a class="active" href="index.html">Examples</a></li>
      <li><a href="../apidoc">API</a></li>
      <li><a href="https://github.com/openlayers/openlayers">Code</a></li>
     </ul>
    </nav>
   </div>
  </header>
  <div class="container-fluid">
<div id="latest-check" class="alert alert-warning alert-dismissible" role="alert" style="display:none">
<button id="latest-dismiss" type="button" class="close" data-dismiss="alert" aria-label="Close">
<span aria-hidden="true">×</span>
</button>
This example uses OpenLayers v<span>4.3.1</span>.
The <a id="latest-link" href="#" class="alert-link">latest</a>
is v<span id="latest-version"></span>.
</div>
   <div class="row-fluid">
    <div class="span12">
     <h4 id="title">Tile Transitions</h4>
     <div id="map" class="map"></div>
     <label>
      render with an opacity transition
     <input id="transition" type="checkbox" checked>
    </label>
    </div>
   </div>
   <div class="row-fluid">
    <div class="span12">
     <p id="shortdesc">Custom configuration for opacity
      transitions on tiles.</p>
     <div id="docs"><p>By default tiles are rendered
      with an opacity transition - fading in over 250 ms.
      To disable this behavior, set the <code>transition
      </code> option of the tile source to 0.</p>
     </div>
     <div id="api-links">Related API documentation:
      <ul class="inline">
       <li>
        <a href="../apidoc/ol.Map.html" title="API documentation for ol.Map">ol.Map</a>
       </li>,
       <li>
        <a href="../apidoc/ol.View.html" title="API documentation for ol.View">ol.View</a>
       </li>,
       <li>
        <a href="../apidoc/ol.layer.Tile.html" title="API documentation for ol.layer.Tile">ol.layer.Tile</a>
       </li>,
       <li>
        <a href="../apidoc/ol.source.XYZ.html" title="API documentation for ol.source.XYZ">ol.source.XYZ</a>
       </li>
      </ui>
     </div>
    </div>
   </div>
   <div class="row-fluid">
    <div id="source-controls">
     <a id="copy-button">
      <i class="fa fa-clipboard"></i> Copy
     </a>
     <a id="codepen-button">
      <i class="fa fa-codepen"></i> Edit
     </a>
    </div>
    <form method="POST" id="codepen-form" target="_blank" action="https://codepen.io/pen/define/">
     <textarea class="hidden" name="title">Tile Transitions</textarea>
     <textarea class="hidden" name="description">Custom configuration for opacity transitions on tiles.</textarea>
     <textarea class="hidden" name="js">
// --- 省略 ---
</html></code></pre>
   </div>
  </div>
  <script src="./resources/common.js"></script>
  <script src="./resources/prism/prism.min.js"></script>
  <!--
  <script src="loader.js?id=tile-transitions"></script>
  -->
  <!-- ファイル修正 -->
  <script src="loader.js?id=2173-ol4ex"></script>
</body>
 <script>
  var packageUrl = 'https://raw.githubusercontent.com/openlayers/openlayers.github.io/build/package.json';
  fetch(packageUrl).then(function(response) {
  /** GlobalFetch.fetch()(This is an experimental technology)
   * The fetch() method of the GlobalFetch interface
   * starts the process of fetching a resource. This
   * returns a promise that resolves to the Response
   * object representing the response to your request.
   * GlobalFetch インタフェースの fetch() メソッドは、リソー
   * スを取得する処理を開始します。これは要求に対する応答を表す
   * Response オブジェクトに解決のプロミス(promise)を返しま
   * す。
   *(MDN[https://developer.mozilla.org/ja/docs/Web/API/
   * FGlobalFetch/fetch])
   */
   return response.json();
   /** Response(This is an experimental technology)
    * The Response interface of the Fetch API represents
    * the response to a request.
    * Fetch API の Response インタフェースは、要求に対する応答
    * を表します。
    * (MDN[https://developer.mozilla.org/en-US/docs/Web/
    * API/Response])
    */
   /** Body.json()(This is an experimental technology)
    * The json() method of the Body mixin takes a Response
    * stream and reads it to completion. It returns a
    * promise that resolves with an object literal
    * containing the JSON data.
    * Body mixin の json() メソッドは、Response ストリームを
    * 受け取り、それを完了させるために読み込みます。これは、
    * JSON データを含むオブジェクトリテラルで解決する約束
    * (promisee)を返します。
    * (MDN[https://developer.mozilla.org/en-US/docs/Web/
    * API/Body/json])
    */
  }).then(function(json) {
   var latestVersion = json.version;
   document.getElementById('latest-version').innerHTML = latestVersion;
   var url = window.location.href;
   var branchSearch = url.match(/\/([^\/]*)\/examples\//);
   /** String.prototype.match()
    * 正規表現 に対する 文字列 のマッチングの際に、そのマッチ結
    * 果を得るために使われます。
    * (MDN[https://developer.mozilla.org/ja/docs/Web/
    * JavaScript/Reference/Global_Objects/String/match])
    */
var cookieText = 'dismissed=-' + latestVersion + '-';
   var dismissed = document.cookie.indexOf(cookieText) != -1;
   /** String.prototype.indexOf()
    * 呼び出す String オブジェクト 中で、指定された値が最初に現
    * れたインデックスを返します。fromIndex から検索を始め、値が
    * 見つからない場合は -1 を返します。
    * (MDN[https://developer.mozilla.org/ja/docs/Web/
    * JavaScript/Reference/Global_Objects/String/indexOf])
    */
if (!dismissed && /^v[0-9\.]*$/.test(branchSearch[1]) && '4.1.0' != latestVersion) {
    var link = url.replace(branchSearch[0], '/latest/examples/');
    /** Location.replace()
     * The Location.replace() method replaces the current
     * resource with the one at the provided URL. The
     * difference from the assign() method is that after
     * using replace() the current page will not be saved
     * in session History, meaning the user won't be able
     * to use the back button to navigate to it.
     * 指定された URL に現在の文書を置き換えます。 assign() メ
     * ソッドとの違いは、replace() を用いた後、現在のページは、
     * セッションの履歴には保持されないことです。つまり、ユーザ
     * は、置き換え前のページに戻るために、戻るボタンを使うこと
     * ができません。
     * (MDN[https://developer.mozilla.org/en-US/docs/Web/
     * API/Location/replace])
     */
    fetch(link, {method: 'head'}).then(function(response) {
     var a = document.getElementById('latest-link');
     a.href = response.status == 200 ? link : '../../latest/examples/';
     /** Response.status(This is an experimental technology)
      * The status read-only property of the Response
      * interface contains the status code of the response
      * (e.g., 200 for a success).
      * Response インタフェースの status 読み取り専用プロパティ
      * は、応答のステータス・コード(例えば、成功のために 200)
      * を含みます。
     * (MDN[https://developer.mozilla.org/en-US/docs/Web/
     * API/Response/status])
      */
    });
    var latestCheck = document.getElementById('latest-check');
    latestCheck.style.display = '';
    document.getElementById('latest-dismiss').onclick = function() {
     latestCheck.style.display = 'none';
     document.cookie = cookieText;
    }
   }
  });
 </script>
</html>
COMMONJS は
COMMONJS
http://webpack.github.io/docs/commonjs.html
に、次のようにあります。
The CommonJS group defined a module format to solve
JavaScript scope issues by making sure each module is executed in its
own namespace.
This is achieved by forcing modules to explicitly
export those variables it wants to expose to the “universe”, and also by
defining those other modules required to properly work.
To achieve this CommonJS give you two tools:
the require() function, which allows to import a given module into the current scope.
the module object, which allows to export something from the current scope.
CommonJSグループは、それ自身の名前空間内で実行されている各モジュールを確認することによって、JavaScriptのスコープ問題を解決するためのモジュールフォーマットを定義しました。
これは、それが「universe(?)」に公開したい変数を明示的にエクスポートするモジュールを強制することによって、同じように、正常に動作するのに必要な他のモジュールを定義することによって、達成されます。
この CommonJS を達成するために2つのツールを与えます:
require()関数、指定したモジュールを現在のスコープにインポートすることができます。
モジュールオブジェクト、現在のスコープからエクスポートすることができます。
Prism は、
Prism
http://prismjs.com/
に、次のようにあります。
Prism
is a lightweight, extensible syntax highlighter, built with modern web
standards in mind. It’s a spin-off from Dabblet and is tested there
daily by thousands.
Prismは、最新のWeb標準に構築されたことを考慮し軽量で拡張可能なシンタックスハイライトです。それは Dabblet からスピンオフで、何千人も日々そこで試験されています。
ZeroClipboard は
ZeroClipboard v2.x
http://zeroclipboard.org/
に、次のようにあります。
The
ZeroClipboard library provides an easy way to copy text to the
clipboard using an invisible Adobe Flash movie and a JavaScript
interface.
ZeroClipboard ライブラリは、見えない Adobe Flash ムービーとJavaScript のインターフェイスを使用してテキストをクリップボードにコピーする簡単な方法を提供します。
Debian 9 では動作しませんでした。ボタンを右クリックしたときに flash のコンテキストメニューが表示されると動作しています。


