
日本時間でクリスマスイブ(2014.12.24)に v3.1.1 がリリースされました。
その3日前に v3.1.0 がリリースされていたようで、その修正版になります。
examples も変更があるようですが、v3.0.0 が一段落ついたらみてみようと思います。
(2015.1.13 追加)
このあと、v3.1.1 で残りの examples を続けて試してみます。
Releases openlayers/ol3 GitHub
(https://github.com/openlayers/ol3/releases)より
v3.1.1
Summary
要約
This patch release fixes an issue with the select interaction in the 3.1.0 release.
Changes
このパッチリリースは、3.1.0 リリースのセレクトインターラクションで項目を修正します。
#3082 - Correct arguments for forEachGeometryAtPixel. (@tschaub)
forEachGeometryAtPixel のための引数を修正。
v3.1.0
Summary
要約
The 3.1.0 release includes a whopping 214 merged pull requests since 3.0.0. Of note, the WebGL renderer now supports point rendering. You can use UTFGrids for interaction! Styles can now specify alternate geometries for rendering. Library builds can now be loaded with module loaders like Browserify or RequireJS. You can now symbolize point features with stars, squares, enneadecagons, or any other regular(ish) polygon. See the full list of changes below.
3.1.0リリースは、3.0.0以降のプルリクエスト(訳注:Git でリクエストを出す機能)がマージされた214にのぼる項目が含まれています。注目は、WebGL のレンダラは、現在、ポイントのレンダリングをサポートしています。インターラクションに UTFGrids を使用することができます!スタイルは、現在、レンダリングのための代替のジオメトリを指定することができます。ライブラリ構築は、現在、Browserify(訳注:ブラウザ用の node 風の CommonJS モジュールをコンパイルするためのツール) または RequireJS(訳注:モジュール管理ができる JavaScript ファイル) のようなモジュールローダでロードすることができます。星、四角、90角(?)、またはその他の通常(のような)のポリゴンでポイントフィーチャを象徴することができます。以下の変更の完全なリストを参照してください。(訳注:リストはサイトをみてください。)
Upgrade notes
アップグレードノート
The 3.1.0 release maintains a backwards-compatible API with the 3.0.0 release, so upgrades should be painless. Some special considerations below.
3.1.0 リリースは、3.0.0 のリリースとの下位互換のAPIを維持するので、アップグレードがたやすくなければなりません。以下にいくつかの特別な考慮事項。
If you are using a ol.source.ImageStatic, you no longer need to provide an imageSize option if you don't want any special scaling on your image (see #2796).
ol.source.ImageStatic を使用している場合は、イメージ上の任意の特別なスケーリングをしたくない場合、imageSize オプションを提供する必要がありません(#2796を参照)。
Instead of calling obj.unByKey(key) you can now call ol.Observable.unByKey(key) (see #2794).
obj.unByKey(key)を呼び出す代わりに、現在、ol.Observable.unByKey(key)を呼び出すことができます(#2794を参照)。
If you were using format.writeFeatures(features), note that this method returns a string for all feature formats. We considered the previous behavior a bug (see #3003).
format.writeFeatures(features)を使用していた場合、このメソッドは、すべてのフィーチャのフォーマットの文字列を返すことに注意してください。以前の動作不具合を考慮しました(#3003を参照)。
The obj.dispatchChangeEvent() method is now spelled obj.changed(). This method is still unstable (see #2684).
obj.dispatchChangeEvent()メソッドは、現在、obj.changed()と綴られています。この方法はまだ不安定でです(#2684を参照)。
2014年12月25日木曜日
2 - ol3ex 47b - Custom controls 2
「custom-controls.js(247-ol3ex.js)」は、マップを表示するための JavaScript ファイルです。
「247-ol3ex.js」

「247-ol3ex.js」
/**
 * Define a namespace for the application.
 */
window.app = {};
var app = window.app;
//
// Define rotate to north control.
//
/**
 * @constructor
 * @extends {ol.control.Control}
 * @param {Object=} opt_options Control options.
 */
/** 「@constructor(@class と同義)」
 * The @class tag marks a function as being a
 * constructor, meant to be called with the new
 * keyword to return an instance.
 * @classタグは、インスタンスを返すために、新しいキーワードで
 * 呼び出されることを意図し、コンストラクタとして function を
 * マークします。
 * (@use JSDoc [http://usejsdoc.org/tags-class.html])
 */
/** 「@extends(@augments と同義)」
 * The @augments or@extends tag indicates that a
 * symbol inherits from, and potentially adds to,
 * a parent symbol. You can use this tag to document
 * both class-based and prototype-based inheritance.
 * @augmentsまたは@@extendsタグは、シンボルが親シンボルから
 * 継承し、潜在的に追加する、ことを示しています。
 * あなたは、クラスベースとプロトタイプベース両方の継承を
 * 文書化するために、このタグを使用することができます。
 * (@use JSDoc [http://usejsdoc.org/tags-augments.html])
 */
/** 「@param」
 * The @param tag (or @arg or @argument) documents a
 * function parameter.
 * The @param tag requires you to specify the name of
 * the parameter you are documenting. You can also
 * include the parameter's type, enclosed in curly
 * brackets, and a description of the parameter.
 * @paramタグ(または@argまたは@argument)は、関数の
 * パラメータを文書化します。
 * @paramタグを使用すると、文書化されたパラメータの名前を
 * 指定する必要があります。また、パラメータのタイプと、中括弧
 * で囲まれたおよびパラメータの説明を含めることができます。
 * (@use JSDoc [http://usejsdoc.org/tags-param.html])
 */
app.RotateNorthControl = function(opt_options) {

 var options = opt_options || {};
 var anchor = document.createElement('a');
 /** document.createElement
  * 指定の要素名の要素を生成します。
  * (MDN[https://developer.mozilla.org/ja/docs/Web/
  * API/document.createElement)
  */
 anchor.href = '#rotate-north';
 /** href
  * この要素がクリックされた時に開かれる URL を定義します。
  * text-link を含めるには class 属性が必要です。
  * (MDN[https://developer.mozilla.org/ja/docs/XUL/
  * Attribute/href])
  */
 anchor.innerHTML = 'N';
 /** element.innerHTML
  * innerHTML は、与えられた要素に含まれる全てのマークアップ
  * と内容を設定または取得します。
  * (MDN[https://developer.mozilla.org/ja/docs/Web/
  * API/element.innerHTML])
  */
 var this_ = this;
 var handleRotateNorth = function(e) {
 /** prevent #rotate-north anchor from getting appended to
  * the url
  * url に(テキスト処理による)付加が起こることから
  * #rotate-north アンカーを防ぐ
  */
  e.preventDefault();
  /** preventDefault()
   * Prevents the default browser action.
   * デフォルトのブラウザの動作を防ぐ。
   * (ol3 API)
   */
  this_.getMap().getView().setRotation(0);
  /** getMap()
   * Get the map associated with this control.
   * このコントロールに関連付けられたマップを取得します。
   * (ol3 API)
   */
  /** getView()
   * Get the view associated with this map. A view
   * manages properties such as center and resolution.
   * このマップに関連付けられたビューを取得します。ビューには、
   * 中心や解像度などのプロパティを管理します。(ol3 API)
   */
  /** setRotation()
   * Set the rotation for this view.
   * このビューのローテーションを設定します。(ol3 API)
   */
 anchor.addEventListener('click', handleRotateNorth, false);
 /** EventTarget.addEventListener
  * addEventListener は、 1 つのイベントターゲットにイベント
  * リスナーを1 つ登録します。イベントターゲットは、ドキュメント
  * 上の単一のノード、ドキュメント自身、ウィンドウ、あるいは、
  * XMLHttpRequest です。
  *(MDN[https://developer.mozilla.org/ja/docs/Web/API/
  * EventTarget.addEventListener])
  */
anchor.addEventListener('touchstart', handleRotateNorth, false);
var element = document.createElement('div');
 element.className = 'rotate-north ol-unselectable';
 /** element.className
  * className は要素の class 属性の値の取得 / 設定に用います。
  * (MDN[https://developer.mozilla.org/ja/docs/Web/API/
  * element.className])
  */
 element.appendChild(anchor);
 /** Node.appendChild
  * 特定の親ノードの子ノードリストの末尾にノードを追加します。
  * 追加しようとしたノードが既に存在していたら、それは現在の
  * 親ノードから除かれ、新しい親ノードに追加されます。
  * (MDN[https://developer.mozilla.org/ja/docs/Web/API/
  * Node.appendChild])
  */
 ol.control.Control.call(this, {
 /** ol.control.Control
  * A control is a visible widget with a DOM element in a
  * fixed position on the screen. They can involve user
  * input (buttons), or be informational only; the
  * position is determined using CSS. By default these
  * are placed in the container with CSS class name
  * ol-overlaycontainer-stopevent, but can use any
  * outside DOM element.
  * コントロールは、画面上の固定位置にDOM要素をともなったの可視
  * ウィジェットです。彼らは、ユーザ入力(ボタン)を、または情報
  * 提供のみを含むことができます。すなわち、位置は、CSSを使用して
  * 決定されます。デフォルトでは、これらはCSSクラス名の
  * ol-overlaycontainer-stopevent と共にコンテナに入れら
  * れますが、DOM要素外部のどこでも使用することができます。
  * (ol3 API)
  */
  element: element,
  /** element:
   * The element is the control's container element.
   * This only needs to be specified if you're
   * developing a custom control.
   * element は、コントロールのコンテナ element です。
   * カスタムコントロールを開発している場合は、指定する必要
   * があります。(ol3 API)
   */
  target: options.target
  /** target
   * Specify a target if you want the control to be
   * rendered outside of the map's viewport.
   * マップのビューポートの外にレンダリングするコントロールが
   * 必要なら、ターゲットを指定してください。(ol3 API)
   */
 });

};
ol.inherits(app.RotateNorthControl, ol.control.Control);
/** ol.inherits(childCtor, parentCtor)
 * Inherit the prototype methods from one constructor
 * into another.
 * 1つのコンストラクタから他にプロトタイプのメソッドを継承します。
 * (ol3 API[説明は Stable Only のチェックを外すと表示])
 */
//
// Create map, giving it a rotate to north control.
//
var map = new ol.Map({
 controls: ol.control.defaults({
 /** controls
  * Controls initially added to the map.
  * If not specified, ol.control.defaults() is used.
  * 初期設定で、マップに追加されるコントロール。
  * 明示されていなければ、ol.control.defaults() が使用されます。
  * (ol3 API)
  */
 /** ol.control.defaults()
  * デフォルトでは、マップに含まコントロールのセット。
  * 特に設定しない限り、これは、以下の各コントロールの
  * インスタンスを含むコレクションを返します。(ol3 API)
  * ol.control.Zoom, ol.control.Rotate, ol.control.Attribution
  */
  attributionOptions: /** @type {olx.control.AttributionOptions} */ ({
  /** @type
   * 値のタイプ(型)の説明 - 式などで表示
   * attributionOptions の値の型は、
   * olx.control.AttributionOptions の型を使用。
   * (@use JSDoc[http://usejsdoc.org/]より)
   */
   collapsible: false // 折りたたみ
  })
 }).extend([
  new app.RotateNorthControl()
 ]),
 layers: [
  new ol.layer.Tile({
   source: new ol.source.OSM()
  })
 ],
 renderer: exampleNS.getRendererFromQueryString(),
 //'example-behavior.js' により URL にある renderer を返します
 target: 'map',
 view: new ol.View({
  center: [0, 0],
  zoom: 2,
  rotation: 1
 })
});
2 - ol3ex 47a - Custom controls 1
「Custom controls(custom-controls.html)」を参考に地図を表示してみます。
HTML ファイルの作成
 a Eclipse のメニューの「ファイル」->「ファイルを開く」をクリックします。
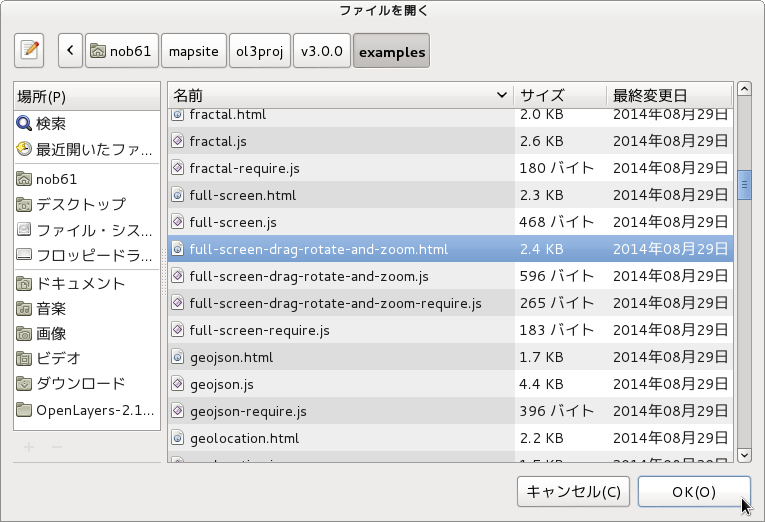
 b 「ファイルを開く」ウィンドウで、「user」->「mapsite」->「ol3proj」->「v3.0.0」->「examples」->「custom-controls.html」をクリックして選択し、「OK」ボタンをクリックします。
同じように「custom-controls.js」を開きます。
 c メニューの「ファイル」->「新規」 -> 「ファイル」をクリックします。
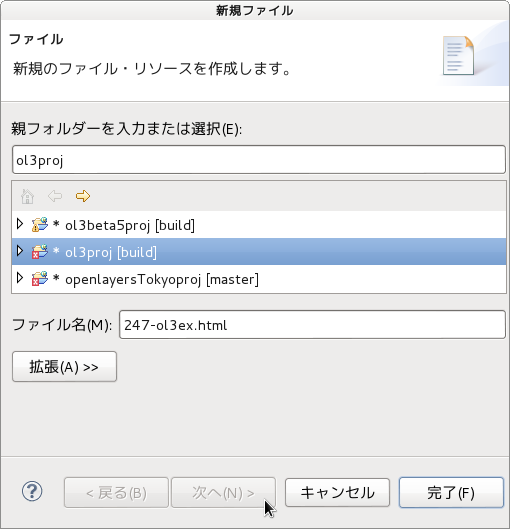 d 「ファイル」ウィンドウで「ol3proj」をクリックして選択し、「ファイル名」を「247-ol3ex.html」と入力し、「次へ」ボタンをクリックします。
 e 「File Template」ウィンドウで「HTML 5 Template」をクリックして選択し、「OK」ボタンをクリックします。
f 「custom-controls.html」の内容をコピーして「247-ol3ex.html」に貼り付け、修正します。
g 同じように、新規に「247-ol3ex.js」ファイルを作成し、「File Template」ウィンドウで「JavaScript Template」をクリックして選択し、「完了」ボタンをクリックして、「custom-controls.js」の内容をコピーして貼り付け、修正します。「custom-controls-require.js」も「247-ol3ex-require.js」に貼り付けます。


「247-ol3ex.html」
HTML ファイルの作成
同じように「custom-controls.js」を開きます。
d 「ファイル」ウィンドウで「ol3proj」をクリックして選択し、「ファイル名」を「247-ol3ex.html」と入力し、「次へ」ボタンをクリックします。f 「custom-controls.html」の内容をコピーして「247-ol3ex.html」に貼り付け、修正します。
g 同じように、新規に「247-ol3ex.js」ファイルを作成し、「File Template」ウィンドウで「JavaScript Template」をクリックして選択し、「完了」ボタンをクリックして、「custom-controls.js」の内容をコピーして貼り付け、修正します。「custom-controls-require.js」も「247-ol3ex-require.js」に貼り付けます。
「247-ol3ex.html」
<!doctype html>
<html lang="en">
 <head>
  <meta charset="utf-8">
  <meta http-equiv="X-UA-Compatible" content="chrome=1">
  <meta name="viewport" content="initial-scale=1.0, user-scalable=no, width=device-width">
<!--
  <link rel="stylesheet" href="../css/ol.css" type="text/css">
  <link rel="stylesheet" href="../resources/bootstrap/css/bootstrap.min.css" type="text/css">
  <link rel="stylesheet" href="../resources/layout.css" type="text/css">
  <link rel="stylesheet" href="../resources/bootstrap/css/bootstrap-responsive.min.css" type="text/css">
-->
  <!-- ディレクトリ修正 -->
  <link rel="stylesheet" href="v3.0.0/css/ol.css" type="text/css">
  <link rel="stylesheet" href="v3.0.0/resources/bootstrap/css/bootstrap.min.css" type="text/css">
  <link rel="stylesheet" href="v3.0.0/resources/layout.css" type="text/css">
  <link rel="stylesheet" href="v3.0.0/resources/bootstrap/css/bootstrap-responsive.min.css" type="text/css">
  <style type="text/css">
   .rotate-north {
    position: absolute;
    top: 65px;
    left: 8px;
    background: rgba(255,255,255,0.4);
    border-radius: 4px;
    padding: 2px;
   }
   .ol-touch .rotate-north {
    top: 80px;
   }
   .rotate-north a {
    display: block;
    color: white;
    font-size: 16px;
    font-family: 'Lucida Grande',Verdana,Geneva,Lucida,Arial,Helvetica,sans-serif;
    font-weight: bold;
    margin: 1px;
    text-decoration: none;
    text-align: center;
    border-radius: 2px;
    height: 22px;
    width: 22px;
    background: rgba(0,60,136,0.5);
   }
   .ol-touch .rotate-north a {
    font-size: 20px;
    height: 30px;
    width: 30px;
    line-height: 26px;
   }
   .rotate-north a:hover {
    background: rgba(0,60,136,0.7);
   }
  </style>
  <title>ol3 custom controls example</title>
 </head>
 <body>
  <!--
  bootstrap.min.css, bootstrap-responsive.min.css で設定されたセレクタを使用。
  -->
  <div class="navbar navbar-inverse navbar-fixed-top">
   <div class="navbar-inner">
    <div class="container">
     <!--
     <a class="brand" href="./"><img src="../resources/logo.png"> OpenLayers 3 Examples</a>
     -->
      <!-- ディレクトリ修正 -->
     <a class="brand" href="v3.0.0/examples/"><img src="v3.0.0/resources/logo.png"> OpenLayers 3 Examples</a>
    </div>
   </div>
  </div>
  <div class="container-fluid">
   <div class="row-fluid">
    <div class="span12">
     <div id="map" class="map"></div>
    </div>
   </div>
   <div class="row-fluid">
    <div class="span12">
     <h4 id="title">Custom controls</h4>
<p id="shortdesc">This example shows how to create custom controls.</p>
     <div id="docs">
      <p>This example creates a "rotate to north" button.
      <!--
      See the <a href="custom-controls.js" target="_blank">custom-controls.js source</a> to see how this is done.</p>
      -->
      <!-- ファイル修正 -->
      See the <a href="247-ol3ex.js" target="_blank">247-ol3ex.js source</a> to see how this is done.</p>
     </div>
     <div id="tags">custom, control</div>
    </div>
   </div>
  </div>
  <!--
  <script src="jquery.min.js" type="text/javascript"></script>
  <script src="../resources/example-behaviour.js" type="text/javascript"></script>
  -->
  <!-- ディレクトリ修正
   jQuery Minified版と
   example-behaviour.js(Examples用 JSコード[文字コードなど])
  -->
  <script src="v3.0.0/examples/jquery.min.js" type="text/javascript"></script>
  <script src="v3.0.0/resources/example-behaviour.js" type="text/javascript"></script>
  <!--
  <script src="loader.js?id=custom-controls" type="text/javascript"></script>
  -->
  <!-- ファイル修正 -->  <!-- ディレクトリ修正 -->
  <script src="loader.js?id=247-ol3ex" type="text/javascript"></script>
 </body>
</html>
2 - ol3ex 46b - Full screen drag rotate and zoom example 2
「full-screen-drag-rotate-and-zoom.js(246-ol3ex.js)」は、マップを表示するための JavaScript ファイルです。
「246-ol3ex.js」

「246-ol3ex.js」
var map = new ol.Map({
 controls: ol.control.defaults().extend([
 /** controls
  * Controls initially added to the map.
  * If not specified, ol.control.defaults() is used.
  * 初期設定で、マップに追加されるコントロール。
  * 明示されていなければ、ol.control.defaults() が使用されます。
  * (ol3 API)
  */
 /** ol.control.defaults()
  * デフォルトでは、マップに含まコントロールのセット。
  * 特に設定しない限り、これは、以下の各コントロールの
  * インスタンスを含むコレクションを返します。(ol3 API)
  * ol.control.Zoom, ol.control.Rotate, ol.control.Attribution
  */
  new ol.control.FullScreen()
  /** ol.control.FullScreen
   * Provides a button that when clicked fills up the
   * full screen with the map. When in full screen mode,
   * a close button is shown to exit full screen mode.
   * The Fullscreen API is used to toggle the map in
   * full screen mode.
   * クリックされたとき、マップと共にフルスクリーンにするボタ
   * ンを提供します。フルスクリーンモードで、閉じるボタンは、
   * フルスクリーンモードを終了するように示されています。フル
   * スクリーン API は、フルスクリーンモードでマップを切り替
   * えるために使用されます。(ol3 API)
   */
]),
 interactions: ol.interaction.defaults().extend([
 /** ol.interaction.defaults
  * Set of interactions included in maps by default.
  * Specific interactions can be excluded by setting
  * the appropriate option to false in the constructor
  * options, but the order of the interactions is fixed.
  * If you want to specify a different order for
  * interactions, you will need to create your own
  * ol.interaction.Interaction instances and insert
  * them into a ol.Collection in the order you want
  * before creating your ol.Map instance.
  * デフォルトでマップに含まれるインターラクションのセット。
  * 具体的なインターラクションは、コンストラクタのオプションで適
  * 切なオプションをfalseに設定することで除外することができます
  * が、インターラクションの順番は固定されています。インターラク
  * ションに対して別の順番を指定したい場合は、独自の
  * ol.interaction.Interaction インスタンスを作成し、ol.Map
  * インスタンスを作成する前に望む順番で 、
  * ol.Collection にそれらを挿入する必要があります。
  * (ol3 API)
  * (訳注:インターラクションの順番は、APIを参照してください。)
  */
  new ol.interaction.DragRotateAndZoom()
  /** ol.interaction.DragRotateAndZoom
   * Allows the user to zoom and rotate the map by
   * clicking and dragging on the map. By default,
   * this interaction is limited to when the shift
   * key is held down.
   * This interaction is only supported for mouse
   * devices.
   * And this interaction is not included in the
   * default interactions.
   * マップ上をクリックとドラッグすることで、マップをズーム
   * し、回転することを許可します。デフォルトでは、このイン
   * ターラクションは、シフトキーを押しているときに制限され
   * ています。
   * このインターラクションは、マウスデバイスだけサポートし
   * ます。
   * このインターラクションは、デフォルトのインターラクショ
   * ンに含まれません。(ol3 API)
   */
]),
layers: [
  new ol.layer.Tile({
  /** ol.layer.Tile
   * For layer sources that provide pre-rendered, tiled
   * images in grids that are organized by zoom levels for
   * specific resolutions.
   * プリレンダリング(事前描画)を提供するレイヤソースのための、
   * 特定の解像度でのズームレベルによって編成されているグリッドの
   * タイルイメージ。(ol3 API)
   */
   source: new ol.source.BingMaps({
   /** ol.source.BingMaps
    * Layer source for Bing Maps tile data.
    * Bing Maps タイルデータのレイヤソース。(ol3 API)
    */
    key: 'Ak-dzM...(省略)',
    imagerySet: 'Aerial'
   })
  })
 ],
// Use the canvas renderer because it's currently the fastest
 target: 'map',
 view: new ol.View({
  center: [-33519607, 5616436],
  rotation: -Math.PI / 8,
  /** Math.PI
   * 円周率。約 3.14159 です。
   * (MDN[https://developer.mozilla.org/ja/docs/Web
   * /JavaScript/Reference/Global_Objects/Math/PI])
   */
  zoom: 8
 })
});
2 - ol3ex 46a - Full screen drag rotate and zoom example 1
「Full screen drag rotate and zoom example(full-screen-drag-rotate-and-zoom.html)」を参考に地図を表示してみます。
説明に次のようにあります。
Hold down Shift + drag to rotate and zoom. Click the button in the top right corner to go full screen. Then do the Shift + drag thing again.
回転とズームをするために 押したまま Shiftキー + drag します。フルスクリーンにするために右上のボタンをクリックします。その後、再び Shift + drag を実行します。
If there is no button on the map, your browser does not support the Full Screen API.
マップにボタンがない場合は、お使いのブラウザはフルスクリーン API をサポートしていません。
HTML ファイルの作成
a Eclipse のメニューの「ファイル」->「ファイルを開く」をクリックします。
 b 「ファイルを開く」ウィンドウで、「user」->「mapsite」->「ol3proj」->「v3.0.0」->「examples」->「full-screen-drag-rotate-and-zoom.html」をクリックして選択し、「OK」ボタンをクリックします。
同じように「full-screen-drag-rotate-and-zoom.js」を開きます。
c メニューの「ファイル」->「新規」 -> 「ファイル」をクリックします。
 d 「ファイル」ウィンドウで「ol3proj」をクリックして選択し、「ファイル名」を「246-ol3ex.html」と入力し、「次へ」ボタンをクリックします。
e 「File Template」ウィンドウで「HTML 5 Template」をクリックして選択し、「OK」ボタンをクリックします。
f 「full-screen-drag-rotate-and-zoom.html」の内容をコピーして「246-ol3ex.html」に貼り付け、修正します。
g 同じように、新規に「246-ol3ex.js」ファイルを作成し、「File Template」ウィンドウで「JavaScript Template」をクリックして選択し、「完了」ボタンをクリックして、「full-screen-drag-rotate-and-zoom.js」の内容をコピーして貼り付け、修正します。「full-screen-drag-rotate-and-zoom-require.js」も「246-ol3ex-require.js」に貼り付けます。

「246-ol3ex.html」
説明に次のようにあります。
Hold down Shift + drag to rotate and zoom. Click the button in the top right corner to go full screen. Then do the Shift + drag thing again.
回転とズームをするために 押したまま Shiftキー + drag します。フルスクリーンにするために右上のボタンをクリックします。その後、再び Shift + drag を実行します。
If there is no button on the map, your browser does not support the Full Screen API.
マップにボタンがない場合は、お使いのブラウザはフルスクリーン API をサポートしていません。
HTML ファイルの作成
b 「ファイルを開く」ウィンドウで、「user」->「mapsite」->「ol3proj」->「v3.0.0」->「examples」->「full-screen-drag-rotate-and-zoom.html」をクリックして選択し、「OK」ボタンをクリックします。同じように「full-screen-drag-rotate-and-zoom.js」を開きます。
f 「full-screen-drag-rotate-and-zoom.html」の内容をコピーして「246-ol3ex.html」に貼り付け、修正します。
g 同じように、新規に「246-ol3ex.js」ファイルを作成し、「File Template」ウィンドウで「JavaScript Template」をクリックして選択し、「完了」ボタンをクリックして、「full-screen-drag-rotate-and-zoom.js」の内容をコピーして貼り付け、修正します。「full-screen-drag-rotate-and-zoom-require.js」も「246-ol3ex-require.js」に貼り付けます。
「246-ol3ex.html」
<!doctype html>
<html lang="en">
 <head>
  <meta charset="utf-8">
  <meta http-equiv="X-UA-Compatible" content="chrome=1">
  <meta name="viewport" content="initial-scale=1.0, user-scalable=no, width=device-width">
<!--
  <link rel="stylesheet" href="../css/ol.css" type="text/css">
  <link rel="stylesheet" href="../resources/bootstrap/css/bootstrap.min.css" type="text/css">
  <link rel="stylesheet" href="../resources/layout.css" type="text/css">
  <link rel="stylesheet" href="../resources/bootstrap/css/bootstrap-responsive.min.css" type="text/css">
-->
  <!-- ディレクトリ修正 -->
  <link rel="stylesheet" href="v3.0.0/css/ol.css" type="text/css">
  <link rel="stylesheet" href="v3.0.0/resources/bootstrap/css/bootstrap.min.css" type="text/css">
  <link rel="stylesheet" href="v3.0.0/resources/layout.css" type="text/css">
  <link rel="stylesheet" href="v3.0.0/resources/bootstrap/css/bootstrap-responsive.min.css" type="text/css">
  <style>
   .map:-moz-full-screen {
    height: 100%;
   }
   .map:-webkit-full-screen {
    height: 100%;
   }
   .map:full-screen {
    height: 100%;
   }
  </style>
  <title>Full screen drag rotate and zoom example</title>
 </head>
 <body>
  <!--
  bootstrap.min.css, bootstrap-responsive.min.css で設定されたセレクタを使用。
  -->
  <div class="navbar navbar-inverse navbar-fixed-top">
   <div class="navbar-inner">
    <div class="container">
     <!--
     <a class="brand" href="./"><img src="../resources/logo.png"> OpenLayers 3 Examples</a>
     -->
      <!-- ディレクトリ修正 -->
     <a class="brand" href="v3.0.0/examples/"><img src="v3.0.0/resources/logo.png"> OpenLayers 3 Examples</a>
    </div>
   </div>
  </div>
  <div class="container-fluid">
   <div class="row-fluid">
    <div class="span12">
     <div id="map" class="map"></div>
    </div>
   </div>
   <div class="row-fluid">
    <div class="span12">
     <h4 id="title">Full screen drag rotate and zoom example</h4>
<p id="shortdesc">Example of drag rotate and zoom control with full screen effect.</p>
     <div id="docs">
      <p>Hold down <code>Shift</code> + drag to rotate and zoom.
      Click the button in the top right corner to go full screen.
      Then do the <code>Shift</code> + drag thing again.</p>
      <p>If there is no button on the map, your browser does not support the
      <a href="http://caniuse.com/#feat=fullscreen">Full Screen API</a>.</p>
     <!--
      <p>See the <a href="full-screen-drag-rotate-and-zoom.js" target="_blank">full-screen-drag-rotate-and-zoom.js source</a> to see how this is done.</p>
     -->
       <!-- ファイル修正 -->
      <p>See the <a href="246-ol3ex.js" target="_blank">246-ol3ex.js source</a> to see how this is done.</p>
     </div>
     <div id="tags">full-screen, drag, rotate, zoom, bing, bing-maps</div>
    </div>
   </div>
  </div>
  <!--
  <script src="jquery.min.js" type="text/javascript"></script>
  <script src="../resources/example-behaviour.js" type="text/javascript"></script>
  -->
  <!-- ディレクトリ修正
   jQuery Minified版と
   example-behaviour.js(Examples用 JSコード[文字コードなど])
  -->
  <script src="v3.0.0/examples/jquery.min.js" type="text/javascript"></script>
  <script src="v3.0.0/resources/example-behaviour.js" type="text/javascript"></script>
  <!--
  <script src="loader.js?id=full-screen-drag-rotate-and-zoom" type="text/javascript"></script>
  -->
  <!-- ファイル修正 -->  <!-- ディレクトリ修正 -->
  <script src="loader.js?id=246-ol3ex" type="text/javascript"></script>
 </body>
</html>
2 - ol3ex 45b - Drag rotate and zoom example 2
「drag-rotate-and-zoom.js(245-ol3ex.js)」は、マップを表示するための JavaScript ファイルです。
「245-ol3ex.js」

「245-ol3ex.js」
var map = new ol.Map({
 interactions: ol.interaction.defaults().extend([
 /** ol.interaction.defaults
  * Set of interactions included in maps by default.
  * Specific interactions can be excluded by setting
  * the appropriate option to false in the constructor
  * options, but the order of the interactions is fixed.
  * If you want to specify a different order for
  * interactions, you will need to create your own
  * ol.interaction.Interaction instances and insert
  * them into a ol.Collection in the order you want
  * before creating your ol.Map instance.
  * デフォルトでマップに含まれるインターラクションのセット。
  * 具体的なインターラクションは、コンストラクタのオプションで適
  * 切なオプションをfalseに設定することで除外することができます
  * が、インターラクションの順番は固定されています。インターラク
  * ションに対して別の順番を指定したい場合は、独自の
  * ol.interaction.Interaction インスタンスを作成し、 ol.Map
  * インスタンスを作成する前に、望む順番で  ol.Collection
  * にそれらを挿入する必要があります。
  * (ol3 API)
  * (訳注:インターラクションの順番は、APIを参照してください。)
  */
  new ol.interaction.DragRotateAndZoom()
  /** ol.interaction.DragRotateAndZoom
   * Allows the user to zoom and rotate the map by
   * clicking and dragging on the map. By default,
   * this interaction is limited to when the shift
   * key is held down.
   * This interaction is only supported for mouse
   * devices.
   * And this interaction is not included in the
   * default interactions.
   * マップ上をクリックとドラッグすることで、マップをズーム
   * し、回転することを許可します。デフォルトでは、このイン
   * ターラクションは、シフトキーを押しているときに制限され
   * ています。
   * このインターラクションは、マウスデバイスだけサポートし
   * ます。
   * このインターラクションは、デフォルトのインターラク
   * ションに含まれません。(ol3 API)
   */
 ]),
 layers: [
  new ol.layer.Tile({
  /** ol.layer.Tile
   * For layer sources that provide pre-rendered, tiled
   * images in grids that are organized by zoom levels for
   * specific resolutions.
   * プリレンダリング(事前描画)を提供するレイヤソースのための、
   * 特定の解像度でのズームレベルによって編成されているグリッドの
   * タイルイメージ。(ol3 API)
   */
   source: new ol.source.MapQuest({layer: 'sat'})
   /** ol.source.MapQuest
    * Layer source for the MapQuest tile server.
    * MapQuest タイルサーバのレイヤソース。(ol3 API
    * 2 - ol3ex 23b - MapQuest example 2 参照)
    */
  })
 ],
 renderer: exampleNS.getRendererFromQueryString(),
 //'example-behavior.js' により URL にある renderer を返します
 target: 'map',
 view: new ol.View({
  center: [0, 0],
  zoom: 2
 })
});
2 - ol3ex 45a - Drag rotate and zoom example 1
「Drag rotate and zoom example(drag-rotate-and-zoom.html)」を参考に地図を表示してみます。
説明に次のようにあります。
A single interaction to drag, rotate, and zoom.
ドラッグと回転、ズームのための単一インターラクション。
Shift + Drag to rotate and zoom the map around its center.
中心近くでマップを回転とズームするには、Shift+Drag を使用します。
HTML ファイルの作成
a Eclipse のメニューの「ファイル」->「ファイルを開く」をクリックします。
 b 「ファイルを開く」ウィンドウで、「user」->「mapsite」->「ol3proj」->「v3.0.0」->「examples」->「drag-rotate-and-zoom.html」をクリックして選択し、「OK」ボタンをクリックします。
同じように「drag-rotate-and-zoom.js」を開きます。
c メニューの「ファイル」->「新規」 -> 「ファイル」をクリックします。
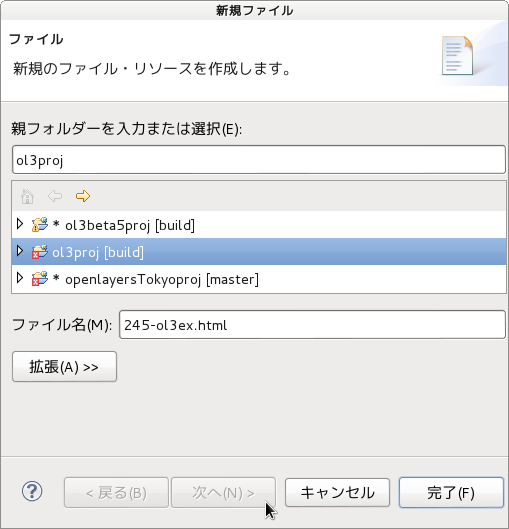 d 「ファイル」ウィンドウで「ol3proj」をクリックして選択し、「ファイル名」を「245-ol3ex.html」と入力し、「次へ」ボタンをクリックします。
e 「File Template」ウィンドウで「HTML 5 Template」をクリックして選択し、「OK」ボタンをクリックします。
f 「drag-rotate-and-zoom.html」の内容をコピーして「245-ol3ex.html」に貼り付け、修正します。
g 同じように、新規に「245-ol3ex.js」ファイルを作成し、「File Template」ウィンドウで「JavaScript Template」をクリックして選択し、「完了」ボタンをクリックして、「drag-rotate-and-zoom.js」の内容をコピーして貼り付け、修正します。「drag-rotate-and-zoom-require.js」も「245-ol3ex-require.js」に貼り付けます。

「245-ol3ex.html」
説明に次のようにあります。
A single interaction to drag, rotate, and zoom.
ドラッグと回転、ズームのための単一インターラクション。
Shift + Drag to rotate and zoom the map around its center.
中心近くでマップを回転とズームするには、Shift+Drag を使用します。
HTML ファイルの作成
同じように「drag-rotate-and-zoom.js」を開きます。
d 「ファイル」ウィンドウで「ol3proj」をクリックして選択し、「ファイル名」を「245-ol3ex.html」と入力し、「次へ」ボタンをクリックします。f 「drag-rotate-and-zoom.html」の内容をコピーして「245-ol3ex.html」に貼り付け、修正します。
g 同じように、新規に「245-ol3ex.js」ファイルを作成し、「File Template」ウィンドウで「JavaScript Template」をクリックして選択し、「完了」ボタンをクリックして、「drag-rotate-and-zoom.js」の内容をコピーして貼り付け、修正します。「drag-rotate-and-zoom-require.js」も「245-ol3ex-require.js」に貼り付けます。
「245-ol3ex.html」
<!doctype html>
<html lang="en">
 <head>
  <meta charset="utf-8">
  <meta http-equiv="X-UA-Compatible" content="chrome=1">
  <meta name="viewport" content="initial-scale=1.0, user-scalable=no, width=device-width">
<!--
  <link rel="stylesheet" href="../css/ol.css" type="text/css">
  <link rel="stylesheet" href="../resources/bootstrap/css/bootstrap.min.css" type="text/css">
  <link rel="stylesheet" href="../resources/layout.css" type="text/css">
  <link rel="stylesheet" href="../resources/bootstrap/css/bootstrap-responsive.min.css" type="text/css">
-->
  <!-- ディレクトリ修正 -->
  <link rel="stylesheet" href="v3.0.0/css/ol.css" type="text/css">
  <link rel="stylesheet" href="v3.0.0/resources/bootstrap/css/bootstrap.min.css" type="text/css">
  <link rel="stylesheet" href="v3.0.0/resources/layout.css" type="text/css">
  <link rel="stylesheet" href="v3.0.0/resources/bootstrap/css/bootstrap-responsive.min.css" type="text/css">
  <title>Drag rotate and zoom example</title>
 </head>
 <body>
  <!--
  bootstrap.min.css, bootstrap-responsive.min.css で設定されたセレクタを使用。
  -->
  <div class="navbar navbar-inverse navbar-fixed-top">
   <div class="navbar-inner">
    <div class="container">
     <!--
     <a class="brand" href="./"><img src="../resources/logo.png"> OpenLayers 3 Examples</a>
     -->
      <!-- ディレクトリ修正 -->
     <a class="brand" href="v3.0.0/examples/"><img src="v3.0.0/resources/logo.png"> OpenLayers 3 Examples</a>
    </div>
   </div>
  </div>
  <div class="container-fluid">
   <div class="row-fluid">
    <div class="span12">
     <div id="map" class="map"></div>
    </div>
   </div>
   <div class="row-fluid">
    <div class="span12">
     <h4 id="title">Drag rotate and zoom example</h4>
<p id="shortdesc">Example of a rotated map.</p>
     <div id="docs">
      <p><code>Shift</code>+ Drag to rotate and zoom the map around its center.</p>
     <!--
      <p>See the <a href="drag-rotate-and-zoom.js" target="_blank">drag-rotate-and-zoom.js source</a> to see how this is done.</p>
     -->
       <!-- ファイル修正 -->
      <p>See the <a href="245-ol3ex.js" target="_blank">245-ol3ex.js source</a> to see how this is done.</p>
     </div>
     <div id="tags">drag, rotate, zoom, interaction</div>
    </div>
   </div>
  </div>
  <!--
  <script src="jquery.min.js" type="text/javascript"></script>
  <script src="../resources/example-behaviour.js" type="text/javascript"></script>
  -->
  <!-- ディレクトリ修正
   jQuery Minified版と
   example-behaviour.js(Examples用 JSコード[文字コードなど])
  -->
  <script src="v3.0.0/examples/jquery.min.js" type="text/javascript"></script>
  <script src="v3.0.0/resources/example-behaviour.js" type="text/javascript"></script>
  <!--
  <script src="loader.js?id=drag-rotate-and-zoom" type="text/javascript"></script>
  -->
  <!-- ファイル修正 -->  <!-- ディレクトリ修正 -->
  <script src="loader.js?id=245-ol3ex" type="text/javascript"></script>
 </body>
</html>
2 - ol3ex 44b - Rotation example 2
「rotation.js(244-ol3ex.js)」は、マップを表示するための JavaScript ファイルです。
「244-ol3ex.js」

「244-ol3ex.js」
var map = new ol.Map({
 layers: [
  new ol.layer.Tile({
  /** ol.layer.Tile
   * For layer sources that provide pre-rendered, tiled
   * images in grids that are organized by zoom levels for
   * specific resolutions.
   * プリレンダリング(事前描画)を提供するレイヤソースのための、
   * 特定の解像度でのズームレベルによって編成されているグリッドの
   * タイルイメージ。(ol3 API)
   */
   source: new ol.source.OSM()
   /** ol.source.OSM
    * Layer source for the OpenStreetMap tile server.
    * OpenStreetMap タイルサーバのレイヤソース。(ol3 API)
    */
  })
 ],
 renderer: exampleNS.getRendererFromQueryString(),
 //'example-behavior.js' により URL にある renderer を返します
target: 'map',
 controls: ol.control.defaults({
 /** controls
  * Controls initially added to the map.
  * If not specified, ol.control.defaults() is used.
  * 初期設定で、マップに追加されるコントロール。
  * 明示されていなければ、ol.control.defaults() が使用されます。
  * (ol3 API)
  */
 /** ol.control.defaults()
  * デフォルトでは、マップに含まコントロールのセット。
  * 特に設定しない限り、これは、以下の各コントロールの
  * インスタンスを含むコレクションを返します。(ol3 API)
  * ol.control.Zoom, ol.control.Rotate, ol.control.Attribution
  */
  attributionOptions: /** @type {olx.control.AttributionOptions} */ ({
  /** @type
   * 値のタイプ(型)の説明 - 式などで表示
   * attributionOptions の値の型は、
   * olx.control.AttributionOptions の型を使用。
   * (@use JSDoc[http://usejsdoc.org/]より)
   */
   collapsible: false // 折りたたみ
  })
 }),
 view: new ol.View({
  center: [-25860000, 4130000],
  rotation: Math.PI / 6,
  /** Math.PI
   * 円周率。約 3.14159 です。
   * (MDN[https://developer.mozilla.org/ja/docs/Web
   * /JavaScript/Reference/Global_Objects/Math/PI])
   */
  zoom: 10
 })
});
2 - ol3ex 44a - Rotation example 1
「Rotation example(rotation.html)」を参考に地図を表示してみます。
説明に次のようにあります。
Use Alt+Shift+drag to rotate the map.
マップを回転するには、Alt+Shift+drag を使用します。
とありますが、操作できませんでした。
HTML ファイルの作成
a Eclipse のメニューの「ファイル」->「ファイルを開く」をクリックします。
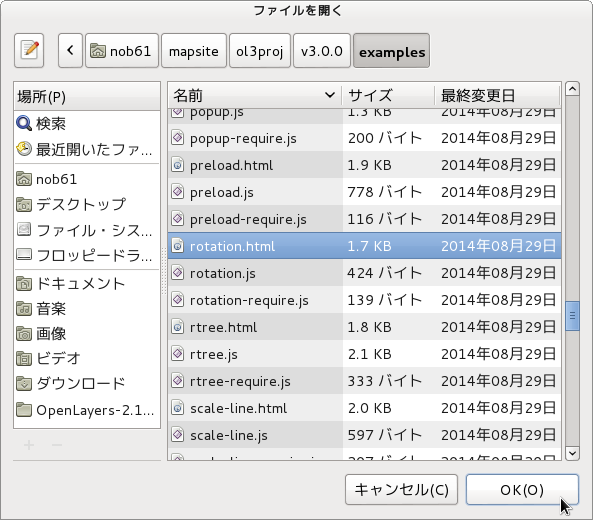 b 「ファイルを開く」ウィンドウで、「user」->「mapsite」->「ol3proj」->「v3.0.0」->「examples」->「rotation.html」をクリックして選択し、「OK」ボタンをクリックします。
同じように「rotation.js」を開きます。
c メニューの「ファイル」->「新規」 -> 「ファイル」をクリックします。
 d 「ファイル」ウィンドウで「ol3proj」をクリックして選択し、「ファイル名」を「244-ol3ex.html」と入力し、「次へ」ボタンをクリックします。
e 「File Template」ウィンドウで「HTML 5 Template」をクリックして選択し、「OK」ボタンをクリックします。
f 「rotation.html」の内容をコピーして「244-ol3ex.html」に貼り付け、修正します。
g 同じように、新規に「244-ol3ex.js」ファイルを作成し、「File Template」ウィンドウで「JavaScript Template」をクリックして選択し、「完了」ボタンをクリックして、「rotation.js」の内容をコピーして貼り付け、修正します。「rotation-require.js」も「244-ol3ex-require.js」に貼り付けます。

「244-ol3ex.html」
説明に次のようにあります。
Use Alt+Shift+drag to rotate the map.
マップを回転するには、Alt+Shift+drag を使用します。
とありますが、操作できませんでした。
HTML ファイルの作成
b 「ファイルを開く」ウィンドウで、「user」->「mapsite」->「ol3proj」->「v3.0.0」->「examples」->「rotation.html」をクリックして選択し、「OK」ボタンをクリックします。同じように「rotation.js」を開きます。
f 「rotation.html」の内容をコピーして「244-ol3ex.html」に貼り付け、修正します。
g 同じように、新規に「244-ol3ex.js」ファイルを作成し、「File Template」ウィンドウで「JavaScript Template」をクリックして選択し、「完了」ボタンをクリックして、「rotation.js」の内容をコピーして貼り付け、修正します。「rotation-require.js」も「244-ol3ex-require.js」に貼り付けます。
「244-ol3ex.html」
<!doctype html>
<html lang="en">
 <head>
  <meta charset="utf-8">
  <meta http-equiv="X-UA-Compatible" content="chrome=1">
  <meta name="viewport" content="initial-scale=1.0, user-scalable=no, width=device-width">
<!--
  <link rel="stylesheet" href="../css/ol.css" type="text/css">
  <link rel="stylesheet" href="../resources/bootstrap/css/bootstrap.min.css" type="text/css">
  <link rel="stylesheet" href="../resources/layout.css" type="text/css">
  <link rel="stylesheet" href="../resources/bootstrap/css/bootstrap-responsive.min.css" type="text/css">
-->
  <!-- ディレクトリ修正 -->
  <link rel="stylesheet" href="v3.0.0/css/ol.css" type="text/css">
  <link rel="stylesheet" href="v3.0.0/resources/bootstrap/css/bootstrap.min.css" type="text/css">
  <link rel="stylesheet" href="v3.0.0/resources/layout.css" type="text/css">
  <link rel="stylesheet" href="v3.0.0/resources/bootstrap/css/bootstrap-responsive.min.css" type="text/css">
  <title>Rotation example</title>
 </head>
 <body>
  <!--
  bootstrap.min.css, bootstrap-responsive.min.css で設定されたセレクタを使用。
  -->
  <div class="navbar navbar-inverse navbar-fixed-top">
   <div class="navbar-inner">
    <div class="container">
     <!--
     <a class="brand" href="./"><img src="../resources/logo.png"> OpenLayers 3 Examples</a>
     -->
      <!-- ディレクトリ修正 -->
     <a class="brand" href="v3.0.0/examples/"><img src="v3.0.0/resources/logo.png"> OpenLayers 3 Examples</a>
    </div>
   </div>
  </div>
  <div class="container-fluid">
   <div class="row-fluid">
    <div class="span12">
     <div id="map" class="map"></div>
    </div>
   </div>
   <div class="row-fluid">
    <div class="span12">
     <h4 id="title">Rotation example</h4>
<p id="shortdesc">Example of a rotated map.</p>
     <div id="docs">
      <p>Use <code>Alt</code>+<code>Shift</code>+drag to rotate the map.</p>
     <!--
      <p>See the <a href="rotation.js" target="_blank">rotation.js source</a> to see how this is done.</p>
     -->
       <!-- ファイル修正 -->
      <p>See the <a href="244-ol3ex.js" target="_blank">244-ol3ex.js source</a> to see how this is done.</p>
     </div>
     <div id="tags">rotation, openstreetmap</div>
    </div>
   </div>
  </div>
  <!--
  <script src="jquery.min.js" type="text/javascript"></script>
  <script src="../resources/example-behaviour.js" type="text/javascript"></script>
  -->
  <!-- ディレクトリ修正
   jQuery Minified版と
   example-behaviour.js(Examples用 JSコード[文字コードなど])
  -->
  <script src="v3.0.0/examples/jquery.min.js" type="text/javascript"></script>
  <script src="v3.0.0/resources/example-behaviour.js" type="text/javascript"></script>
  <!--
  <script src="loader.js?id=rotation" type="text/javascript"></script>
  -->
  <!-- ファイル修正 -->  <!-- ディレクトリ修正 -->
  <script src="loader.js?id=244-ol3ex" type="text/javascript"></script>
 </body>
</html>
2 - ol3ex 43b - Zoom constrained example 2
「zoom-constrained.js(243-ol3ex.js)」は、マップを表示するための JavaScript ファイルです。
「243-ol3ex.js」

「243-ol3ex.js」
var map = new ol.Map({
 target: 'map',
 layers: [
  new ol.layer.Tile({
  /** ol.layer.Tile
   * For layer sources that provide pre-rendered, tiled
   * images in grids that are organized by zoom levels for
   * specific resolutions.
   * プリレンダリング(事前描画)を提供するレイヤソースのための、
   * 特定の解像度でのズームレベルによって編成されているグリッドの
   * タイルイメージ。(ol3 API)
   */
   source: new ol.source.BingMaps({
   /** ol.source.BingMaps
    * Layer source for Bing Maps tile data.
    * Bing Maps タイルデータのレイヤソース。(ol3 API)
    */
    key: 'Ak-dzM...(省略)',
    imagerySet: 'Aerial'
   })
  })
 ],
 view: new ol.View({
  center: [-13553864, 5918250],
  zoom: 11,
  minZoom: 9,
  maxZoom: 13
 })
});
2 - ol3ex 43a - Zoom constrained example 1
「Zoom constrained example(zoom-constrained.html)」を参考に地図を表示してみます。
説明に次のようにあります。
This map has a view that is constrained between zoom levels 9 and 13. This is done using the minZoom and maxZoom view options.
このマップは、ズームレベル9とズームレベル3の間に制限されたビューになっています。これは、 minZoom と maxZoom のビューオプションを使用して実行されています。
HTML ファイルの作成
a Eclipse のメニューの「ファイル」->「ファイルを開く」をクリックします。
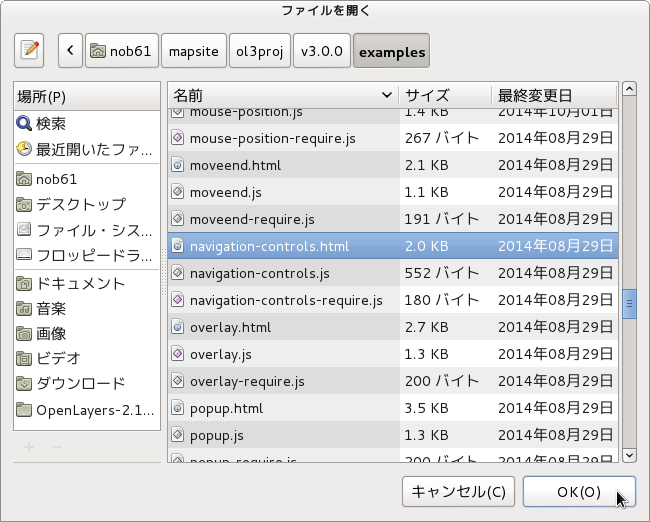
 b 「ファイルを開く」ウィンドウで、「user」->「mapsite」->「ol3proj」->「v3.0.0」->「examples」->「zoom-constrained.html」をクリックして選択し、「OK」ボタンをクリックします。
同じように「zoom-constrained.js」を開きます。
c メニューの「ファイル」->「新規」 -> 「ファイル」をクリックします。
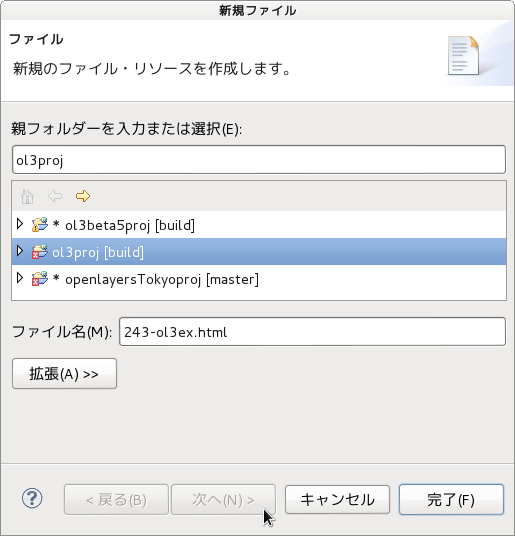 d 「ファイル」ウィンドウで「ol3proj」をクリックして選択し、「ファイル名」を「243-ol3ex.html」と入力し、「次へ」ボタンをクリックします。
e 「File Template」ウィンドウで「HTML 5 Template」をクリックして選択し、「OK」ボタンをクリックします。
f 「zoom-constrained.html」の内容をコピーして「243-ol3ex.html」に貼り付け、修正します。
g 同じように、新規に「243-ol3ex.js」ファイルを作成し、「File Template」ウィンドウで「JavaScript Template」をクリックして選択し、「完了」ボタンをクリックして、「zoom-constrained.js」の内容をコピーして貼り付け、修正します。「zoom-constrained-require.js」も「243-ol3ex-require.js」に貼り付けます。

「243-ol3ex.html」
説明に次のようにあります。
This map has a view that is constrained between zoom levels 9 and 13. This is done using the minZoom and maxZoom view options.
このマップは、ズームレベル9とズームレベル3の間に制限されたビューになっています。これは、 minZoom と maxZoom のビューオプションを使用して実行されています。
HTML ファイルの作成
同じように「zoom-constrained.js」を開きます。
d 「ファイル」ウィンドウで「ol3proj」をクリックして選択し、「ファイル名」を「243-ol3ex.html」と入力し、「次へ」ボタンをクリックします。f 「zoom-constrained.html」の内容をコピーして「243-ol3ex.html」に貼り付け、修正します。
g 同じように、新規に「243-ol3ex.js」ファイルを作成し、「File Template」ウィンドウで「JavaScript Template」をクリックして選択し、「完了」ボタンをクリックして、「zoom-constrained.js」の内容をコピーして貼り付け、修正します。「zoom-constrained-require.js」も「243-ol3ex-require.js」に貼り付けます。
「243-ol3ex.html」
<!doctype html>
<html lang="en">
 <head>
  <meta charset="utf-8">
  <meta http-equiv="X-UA-Compatible" content="chrome=1">
  <meta name="viewport" content="initial-scale=1.0, user-scalable=no, width=device-width">
<!--
  <link rel="stylesheet" href="../css/ol.css" type="text/css">
  <link rel="stylesheet" href="../resources/bootstrap/css/bootstrap.min.css" type="text/css">
  <link rel="stylesheet" href="../resources/layout.css" type="text/css">
  <link rel="stylesheet" href="../resources/bootstrap/css/bootstrap-responsive.min.css" type="text/css">
-->
  <!-- ディレクトリ修正 -->
  <link rel="stylesheet" href="v3.0.0/css/ol.css" type="text/css">
  <link rel="stylesheet" href="v3.0.0/resources/bootstrap/css/bootstrap.min.css" type="text/css">
  <link rel="stylesheet" href="v3.0.0/resources/layout.css" type="text/css">
  <link rel="stylesheet" href="v3.0.0/resources/bootstrap/css/bootstrap-responsive.min.css" type="text/css">
  <title>Zoom Constrained example</title>
 </head>
 <body>
  <!--
  bootstrap.min.css, bootstrap-responsive.min.css で設定されたセレクタを使用。
  -->
  <div class="navbar navbar-inverse navbar-fixed-top">
   <div class="navbar-inner">
    <div class="container">
     <!--
     <a class="brand" href="./"><img src="../resources/logo.png"> OpenLayers 3 Examples</a>
     -->
      <!-- ディレクトリ修正 -->
     <a class="brand" href="v3.0.0/examples/"><img src="v3.0.0/resources/logo.png"> OpenLayers 3 Examples</a>
    </div>
   </div>
  </div>
  <div class="container-fluid">
   <div class="row-fluid">
    <div class="span12">
     <div id="map" class="map"></div>
    </div>
   </div>
   <div class="row-fluid">
    <div class="span12">
     <h4 id="title">Zoom Constrained example</h4>
<p id="shortdesc">Example of a zoom constrained view.</p>
     <div id="docs">
      <p>This map has a view that is constrained between zoom levels 9 and 13.
       This is done using the <code>minZoom</code> and <code>maxZoom</code> view options.</p>
     <!--
      <p>See the <a href="zoom-constrained.js" target="_blank">navigation-controls.js source</a> for details.</p>
     -->
       <!-- ファイル修正 -->
      <p>See the <a href="243-ol3ex.js" target="_blank">243-ol3ex.js source</a> for details.</p>
     </div>
     <div id="tags">bing, zoom, minZoom, maxZoom</div>
    </div>
   </div>
  </div>
  <!--
  <script src="jquery.min.js" type="text/javascript"></script>
  <script src="../resources/example-behaviour.js" type="text/javascript"></script>
  -->
  <!-- ディレクトリ修正
   jQuery Minified版と
   example-behaviour.js(Examples用 JSコード[文字コードなど])
  -->
  <script src="v3.0.0/examples/jquery.min.js" type="text/javascript"></script>
  <script src="v3.0.0/resources/example-behaviour.js" type="text/javascript"></script>
  <!--
  <script src="loader.js?id=zoom-constrained" type="text/javascript"></script>
  -->
  <!-- ファイル修正 -->  <!-- ディレクトリ修正 -->
  <script src="loader.js?id=243-ol3ex" type="text/javascript"></script>
 </body>
</html>
2 - ol3ex 42b - Navigation controls example 2
「navigation-controls.js(242-ol3ex.js)」は、マップを表示するための JavaScript ファイルです。


var map = new ol.Map({
 controls: ol.control.defaults({
 /** controls
  * Controls initially added to the map.
  * If not specified, ol.control.defaults() is used.
  * 初期設定で、マップに追加されたコントロール。
  * 明示されていなければ、ol.control.defaults() が使用されます。
  * (ol3 API)
  */
 /** ol.control.defaults()
  * デフォルトでは、マップに含まコントロールのセット。
  * 特に設定しない限り、これは、以下の各コントロールの
  * インスタンスを含むコレクションを返します。(ol3 API)
  * ol.control.Zoom, ol.control.Rotate, ol.control.Attribution
  */
  attributionOptions: /** @type {olx.control.AttributionOptions} */ ({
  /** @type
   * 値のタイプ(型)の説明 - 式などで表示
   * attributionOptions の値の型は、
   * olx.control.AttributionOptions の型を使用。
   * (@use JSDoc[http://usejsdoc.org/]より)
   */
   collapsible: false // 折りたたみ
  })
 }).extend([
  new ol.control.ZoomToExtent({
  /** ol.control.ZoomToExtent
   * A button control which, when pressed, changes
   * the map view to a specific extent. To style this
   * control use the css selector .ol-zoom-extent.
   * 押したとき、マップビューを指定の範囲に変えるボタンコントロー
   * ル。スタイルのために、このコントロールは、css セレクタ
   * .ol-zoom-extent を使用します。
   */
   extent: [
    813079.7791264898, 5929220.284081122,
    848966.9639063801, 5936863.986909639
   ]
  })
 ]),
layers: [
  new ol.layer.Tile({
  /** ol.layer.Tile
   * For layer sources that provide pre-rendered, tiled
   * images in grids that are organized by zoom levels for
   * specific resolutions.
   * プリレンダリング(事前描画)を提供するレイヤソースのための、
   * 特定の解像度でのズームレベルによって編成されているグリッドの
   * タイルイメージ。(ol3 API)
   */
   source: new ol.source.OSM()
   /** ol.source.OSM
    * Layer source for the OpenStreetMap tile server.
    * OpenStreetMap タイルサーバのレイヤソース。(ol3 API)
    */
  })
 ],
 renderer: exampleNS.getRendererFromQueryString(),
 //'example-behavior.js' により URL にある renderer を返します
 target: 'map',
 view: new ol.View({
  center: [0, 0],
  zoom: 2
 })
});
2 - ol3ex 42a - Navigation controls example 1
「Navigation controls example((navigation-controls.html)」を参考に地図を表示してみます。
説明に次のようにあります。
The following navigation controls are added to the map:
次のナビゲーションコントロールがマップに追加されています。
ol.control.Zoom (added by default)
ol.control.ZoomToExtent
HTML ファイルの作成
a Eclipse のメニューの「ファイル」->「ファイルを開く」をクリックします。
 b 「ファイルを開く」ウィンドウで、「user」->「mapsite」->「ol3proj」->「v3.0.0」->「examples」->「navigation-controls.html」をクリックして選択し、「OK」ボタンをクリックします。
同じように「navigation-controls.js」を開きます。
c メニューの「ファイル」->「新規」 -> 「ファイル」をクリックします。
 d 「ファイル」ウィンドウで「ol3proj」をクリックして選択し、「ファイル名」を「242-ol3ex.html」と入力し、「次へ」ボタンをクリックします。
e 「File Template」ウィンドウで「HTML 5 Template」をクリックして選択し、「OK」ボタンをクリックします。
f 「navigation-controls.html」の内容をコピーして「242-ol3ex.html」に貼り付け、修正します。
g 同じように、新規に「242-ol3ex.js」ファイルを作成し、「File Template」ウィンドウで「JavaScript Template」をクリックして選択し、「完了」ボタンをクリックして、「navigation-controls.js」の内容をコピーして貼り付け、修正します。「navigation-controls-require.js」も「242-ol3ex-require.js」に貼り付けます。

「242-ol3ex.html」
説明に次のようにあります。
The following navigation controls are added to the map:
次のナビゲーションコントロールがマップに追加されています。
ol.control.Zoom (added by default)
ol.control.ZoomToExtent
HTML ファイルの作成
b 「ファイルを開く」ウィンドウで、「user」->「mapsite」->「ol3proj」->「v3.0.0」->「examples」->「navigation-controls.html」をクリックして選択し、「OK」ボタンをクリックします。同じように「navigation-controls.js」を開きます。
f 「navigation-controls.html」の内容をコピーして「242-ol3ex.html」に貼り付け、修正します。
g 同じように、新規に「242-ol3ex.js」ファイルを作成し、「File Template」ウィンドウで「JavaScript Template」をクリックして選択し、「完了」ボタンをクリックして、「navigation-controls.js」の内容をコピーして貼り付け、修正します。「navigation-controls-require.js」も「242-ol3ex-require.js」に貼り付けます。
「242-ol3ex.html」
<!doctype html>
<html lang="en">
 <head>
  <meta charset="utf-8">
  <meta http-equiv="X-UA-Compatible" content="chrome=1">
  <meta name="viewport" content="initial-scale=1.0, user-scalable=no, width=device-width">
<!--
  <link rel="stylesheet" href="../css/ol.css" type="text/css">
  <link rel="stylesheet" href="../resources/bootstrap/css/bootstrap.min.css" type="text/css">
  <link rel="stylesheet" href="../resources/layout.css" type="text/css">
  <link rel="stylesheet" href="../resources/bootstrap/css/bootstrap-responsive.min.css" type="text/css">
-->
  <!-- ディレクトリ修正 -->
  <link rel="stylesheet" href="v3.0.0/css/ol.css" type="text/css">
  <link rel="stylesheet" href="v3.0.0/resources/bootstrap/css/bootstrap.min.css" type="text/css">
  <link rel="stylesheet" href="v3.0.0/resources/layout.css" type="text/css">
  <link rel="stylesheet" href="v3.0.0/resources/bootstrap/css/bootstrap-responsive.min.css" type="text/css">
  <title>Navigation controls example</title>
 </head>
 <body>
  <!--
  bootstrap.min.css, bootstrap-responsive.min.css で設定されたセレクタを使用。
  -->
  <div class="navbar navbar-inverse navbar-fixed-top">
   <div class="navbar-inner">
    <div class="container">
     <!--
     <a class="brand" href="./"><img src="../resources/logo.png"> OpenLayers 3 Examples</a>
     -->
      <!-- ディレクトリ修正 -->
     <a class="brand" href="v3.0.0/examples/"><img src="v3.0.0/resources/logo.png"> OpenLayers 3 Examples</a>
    </div>
   </div>
  </div>
  <div class="container-fluid">
   <div class="row-fluid">
    <div class="span12">
     <div id="map" class="map"></div>
    </div>
   </div>
   <div class="row-fluid">
    <div class="span12">
     <h4 id="title">Navigation controls example</h4>
     <p id="shortdesc">Shows how to add navigation controls.</p>
      The following navigation controls are added to the map:
      <ul>
       <li><code>ol.control.Zoom</code> (added by default)</li>
       <li><code>ol.control.ZoomToExtent</code></li>
      </ul>
     <div id="docs">
     <!--
      <p>See the <a href="navigation-controls.js" target="_blank">navigation-controls.js source</a> to see how this is done.</p>
     -->
       <!-- ファイル修正 -->
      <p>See the <a href="242-ol3ex.js" target="_blank">242-ol3ex.js source</a> to see how this is done.</p>
     </div>
     <div id="tags">control, navigation, extent</div>
    </div>
   </div>
  </div>
  <!--
  <script src="jquery.min.js" type="text/javascript"></script>
  <script src="../resources/example-behaviour.js" type="text/javascript"></script>
  -->
  <!-- ディレクトリ修正
   jQuery Minified版と
   example-behaviour.js(Examples用 JSコード[文字コードなど])
  -->
  <script src="v3.0.0/examples/jquery.min.js" type="text/javascript"></script>
  <script src="v3.0.0/resources/example-behaviour.js" type="text/javascript"></script>
  <!--
  <script src="loader.js?id=navigation-controls" type="text/javascript"></script>
  -->
  <!-- ファイル修正 -->  <!-- ディレクトリ修正 -->
  <script src="loader.js?id=242-ol3ex" type="text/javascript"></script>
 </body>
</html>
2 - ol3ex 41b - Attributions example 2
「attributions.js(241-ol3ex.js)」は、マップを表示するための JavaScript ファイルです。


var attribution = new ol.control.Attribution({
/** ol.control.Attribution
 * Control to show all the attributions associated
 * with the layer sources in the map. This control
 * is one of the default controls included in maps.
 * By default it will show in the bottom right
 * portion of the map, but this can be changed by
 * using a css selector for .ol-attribution.
 * マップ内のレイヤソースに関連付けられているすべての属性を
 * 表示するコントロール。このコントロールは、マップに含まれ
 * るデフォルトのコントロールの一つです。デフォルトでは、
 * 地図の右下部分に表示されますが、これは、.ol-attribution
 * の CSS セレクタを使用して変更することができます。(ol3 API)
 */
 collapsible: false // 折りたたみ
});
var map = new ol.Map({
 layers: [
  new ol.layer.Tile({
  /** ol.layer.Tile
   * For layer sources that provide pre-rendered, tiled
   * images in grids that are organized by zoom levels for
   * specific resolutions.
   * プリレンダリング(事前描画)を提供するレイヤソースのための、
   * 特定の解像度でのズームレベルによって編成されているグリッドの
   * タイルイメージ。(ol3 API)
   */
   source: new ol.source.OSM()
   /** ol.source.OSM
    * Layer source for the OpenStreetMap tile server.
    * OpenStreetMap タイルサーバのレイヤソース。(ol3 API)
    */
  })
 ],
 controls: ol.control.defaults({ attribution: false }).extend([attribution]),
 /** controls
  * Controls initially added to the map.
  * If not specified, ol.control.defaults() is used.
  * 初期設定で、マップに追加されるコントロール。
  * 明示されていなければ、ol.control.defaults() が使用されます。
  * (ol3 API)
  */
 /** ol.control.defaults()
  * デフォルトでは、マップに含まコントロールのセット。
  * 特に設定しない限り、これは、以下の各コントロールの
  * インスタンスを含むコレクションを返します。(ol3 API)
  * ol.control.Zoom, ol.control.Rotate, ol.control.Attribution
  */
 renderer: exampleNS.getRendererFromQueryString(),
 //'example-behavior.js' により URL にある renderer を返します
 target: 'map',
 view: new ol.View({
  center: [0, 0],
  zoom: 2
 })
});
function checkSize() {
 var small = map.getSize()[0] < 600;
 /** getSize()
  * Get the size of this map.
  * Returns: The size in pixels of
  * the map in the DOM.
  * マップのサイズを取得。(ol3 API)
  */
 attribution.setCollapsible(small);
 /** setCollapsible(collapsible)
  * Name: collapsible, Type: boolean,
  * Description: True if the widget is collapsible.
  * (ol3 API)
  */
 attribution.setCollapsed(small);
 /** setCollapsed(collapsed)
  * Name: collapsed, Type: boolean,
  * Description: True if the widget is collapsed.
  * (ol3 API)
  */
}
$(window).on('resize', checkSize);
/** jQuery on イベント */
checkSize();
登録:
投稿 (Atom)