日本時間で(2018.3.21)に v4.6.5 がリリースされました。
v4.6.4 がリリースされました
日本時間で(2018.1.3)に v4.6.4 がリリースされました。
Releases 4.6.4 - openlayers/openlayers GitHub
(https://github.com/openlayers/openlayers/releases/tag/v4.6.4)より
4.6.4
The v4.6.4 release fixes a feature selection issue when
renderMode: 'image' is set on an ol.layer.Vector.v4.6.4 リリースは、
ol.layer.Vector の「renderMode: 'image'」が設定されたときのフィーチャ選択問題を修正しています。 v4.6.3 がリリースされました
日本時間で(2017.12.8)に v4.6.3 がリリースされました。
Releases 4.6.3 - openlayers/openlayers GitHub
(https://github.com/openlayers/openlayers/releases/tag/v4.6.3)より
4.6.3
The v4.6.3 release fixes a performance issue when
renderMode: 'image' is set on an ol.layer.Vector.v4.6.3 リリースは、
ol.layer.Vector の「renderMode: 'image'」が設定されたときのフィーチャ動作問題を修正しています。 v4.6.2 がリリースされました
日本時間で(2017.12.7)に v4.6.2 がリリースされました。
Releases 4.6.2 - openlayers/openlayers GitHub
(https://github.com/openlayers/openlayers/releases/tag/v4.6.2)より
4.6.2
The v4.6.2 release fixes a regression that could cause tremendous amounts of unneeded vector data to be fetched from the source.
v4.6.2リリースは、膨大な量の無駄なベクタデータがソースから取得される回帰を修正
しています。v4.6.1 がリリースされました
日本時間で(2017.12.7)に v4.6.1 がリリースされました。
Releases 4.6.1 - openlayers/openlayers GitHub
(https://github.com/openlayers/openlayers/releases/tag/v4.6.1)より
4.6.1
The v4.6.1 release fixes a number of issues in the 4.6 releases.
v4.6.1リリースは、4.6リリースのいくつかの問題を修正しています。
v4.6.0 がリリースされました
日本時間で(2017.12.7)に v4.6.0 がリリースされました。
Releases 4.6.0 - openlayers/openlayers GitHub
(https://github.com/openlayers/openlayers/releases/tag/v4.6.0)より
4.6.0
Summary
The 4.6 release includes enhancements and fixes from 30 or so pull requests. Headlining this release, vector layers got new textBackgroundFill, textBackgroundStroke and padding options that can be used to render background boxes for text. ol.source.ImageVector is now deprecated and replaced by a more convenient way to render vectors as images: by simply setting renderMode: 'image' on the vector layer.
6.5リリースには、30個程度のプルリクエストからの拡張と修正が含まれています。 このリリースの表題をつけると、ベクタレイヤは、新しい textBackgroundFill、textBackgroundStroke、テキストに背景ボックスを描画するために使用されるパッディングオプチオンが追加されました。ol.source.ImageVector は非推奨となり、ベクタレイヤに「renderMode: 'image'」を単に設定することで、画像としてベクタを描画するより便利な方法に置き換えられました。
Please note that if you are using closure-util to build your OpenLayers based application, it is time to migrate to using the ol package and a module bundler like webpack. OpenLayers has not had a dependency on the Closure Library since the 3.19 release; and with the 5.0 release we will be moving completely away from goog.require and goog.provide, dropping support for closure-util, and going with ES modules for our sources.
OpenLayers ベースのアプリケーションを構築するために closure-util を使用している場合は、ol パッケージと webpack のようなモジュールバンドラの使用に移行する必要があります。 OpenLayers は 3.19 リリース以降 Closure Library に依存していませんでした。 5.0 リリースでは、goog.require とgoog.provide から完全に離れ、closure-util のサポートを廃止し、ソース用に ES モジュールを サポートします。
See the wiki about upcoming changes in 5.0 and tips on how to upgrade. We likely won't have another 4.x release before the 5.0 release. If you're interested in continuing to get feature enhancements in future releases, migrating to the ol package now will make the transition easier.
5.0 での今後の変更点については wiki を、アップグレード方法についてはヒントを参照してください。 5.0 リリースの前にもう一つの 4.x リリースはない可能性が高いです。 将来のリリースで機能拡張を継続したい場合は、今すぐ ol パッケージに移行すれば簡単に移行できます。
Upgrade notes
Renamed exceedLength option of ol.style.Text to overflow
ol.style.Text の exceedLength オプションを overflow に名前変更
To update your applications, simply replace exceedLength with overflow.
アプリケーションを更新するために、exceedLength を overflow を使用して単純に置き換えてください。
Deprecation of ol.source.ImageVector
ol.source.ImageVector を非推奨
Rendering vector sources as image is now directly supported by ol.layer.Vector with the new renderMode: 'image' configuration option. Change code like this:
画像としてベクタソースを描画するときは、新しい「renderMode: 'image'」設定オプションを使用して ol.layer.Vector によって直接サポートされます。コードはこのように変更してください。
new ol.layer.Image({
 source: new ol.source.ImageVector({
  style: myStyle,
  source: new ol.source.Vector({
   url: 'my/data.json',
   format: new ol.format.GeoJSON()
  })
 })
});
new ol.layer.Vector({
 renderMode: 'image',
 style: myStyle,
 source: new ol.source.Vector({
  url: 'my/data.json',
  format: new ol.format.GeoJSON()
 })
});
(Detailed Changes リストはサイトをみてください。)
OpenLayers のダウンロード
OpenLayers のホームページ(http://openlayers.org/)の「LATEST」の文中の「v4.6.4」をクリックします。
開いたページ「Downloads for the v4.6.4 release(http://openlayers.org/download/)」の「v4.6.4.zip」をクリックしてダウンロードします。
■参考■
「The ol package」と「Hosted builds for development」には、次のようなことが記載されています。
The ol package
The recommended way to use OpenLayers is to work with the ol package. You can install the latest with npm:
OpenLayers を使用する推奨方法は、ol パッケージで作業することです。npm で最新版をインストールできます:
npm install ol
Hosted builds for development
If you want to try out OpenLayers without downloading anything, a full build of each release which can be used in a script tag is available from cdnjs. You will need both the JS build and the CSS files; see the examples or the Quickstart tutorial for usage. Note that you should not use a full build in production, instead you are encouraged to use the ol package described above.
ダウンロードしないで OpenLayers を試したい場合は、スクリプトタグで使用できる各リリースのフルビルドを cdnjs から入手できます。 JSビルドファイルとCSSファイルの両方が必要になります。 使用例については、examples または Quickstart tutorial を参照してください。 本番環境では完全ビルドを使用しないでください。代わりに、上記の ol パッケージを使用することをお勧めします。
■ここまで■
次のようなダイアログが表示されたら「ファイルを保存する」のラジオボタンがオンになっていることを確認して「OK」ボタンをクリックします。
このファイルを解凍します。
user@deb9-vmw:~$ cd ダウンロード
user@deb9-vmw:~/ダウンロード$ ls
---
v4.6.4.zip
---
user@deb9-vmw:~/ダウンロード$ unzip v4.6.4.zip
user@deb9-vmw:~/ダウンロード$ ls
---
v4.6.4
v4.6.4.zip
---
user@deb9-vmw:~/ダウンロード$ ls
---
v4.6.4.zip
---
user@deb9-vmw:~/ダウンロード$ unzip v4.6.4.zip
user@deb9-vmw:~/ダウンロード$ ls
---
v4.6.4
v4.6.4.zip
---
ol4proj フォルダに、解凍した v4.6.4 フォルダを eclipse にインポートします。
eclipse を起動します。
user@deb9-vmw:~/ダウンロード$ cd
user@deb9-vmw:~$ eclipse
user@deb9-vmw:~$ eclipse
起動の途中で「ワークスペースの選択」ウィンドウが表示されます。
「参照」ボタンをクリックして /home/user/public_html/eclipse-workspace でとりあえず「OK」をクリックします。(Web ブラウザで表示しやすくするため eclipse-workspace を /home/user/public_html に移動しました。)
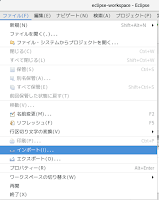
メニューの ファイル -> インポート をクリックします。
「インポート」ダイアログの「選択」の「インポート・ウィザードの選択(S):」で、一般 -> ファイル・システム をクリックして選択し、「次へ」ボタンをクリックします。
「インポート」ダイアログの「ファイル・システム」の「次のディレクトリから(Y):」欄の右側の「参照(R)」ボタンをクリックします。
「ディレクトリーからインポート」ダイアログで左側の「ホーム」をクリックして、表示された「名前」欄の「ダウンロード」をクリックして選択し、「OK」ボタンをクリックします。
「インポート」ダイアログの「ファイル・システム」の「ダウンロード」の左側の三角形をクリックして「ダウンロード」以下の一覧を表示し、「v4.6.4」をクリックして選択します。
「インポート」ダイアログの「ファイル・システム」の「宛先フォルダー(L):」欄の右側の「参照(W)」ボタンをクリックします。
起動の途中で「ワークスペースの選択」ウィンドウが表示されます。
「参照」ボタンをクリックして /home/user/public_html/eclipse-workspace でとりあえず「OK」をクリックします。(Web ブラウザで表示しやすくするため eclipse-workspace を /home/user/public_html に移動しました。)
メニューの ファイル -> インポート をクリックします。
「インポート」ダイアログの「選択」の「インポート・ウィザードの選択(S):」で、一般 -> ファイル・システム をクリックして選択し、「次へ」ボタンをクリックします。
「インポート」ダイアログの「ファイル・システム」の「次のディレクトリから(Y):」欄の右側の「参照(R)」ボタンをクリックします。
 「ディレクトリーからインポート」ダイアログで左側の「ホーム」をクリックして、表示された「名前」欄の「ダウンロード」をクリックして選択し、「OK」ボタンをクリックします。
 「インポート」ダイアログの「ファイル・システム」の「ダウンロード」の左側の三角形をクリックして「ダウンロード」以下の一覧を表示し、「v4.5.0」をクリックして選択します。
 「インポート」ダイアログの「ファイル・システム」の「宛先フォルダー(L):」欄の右側の「参照(W)」ボタンをクリックします。
 「フォルダーにインポート」ダイアログで「ol4proj」をクリックして選択し、「OK」ボタンをクリックします。
「インポート」ダイアログの「ファイル・システム」の「完了(F)」ボタンをクリックします。
検証(時間がかかることがあります)が終わったあと「プロジェクタ・エクスプローラー」ビューの「ol4proj」左側の▽をクリックして、「v4.6.4」を表示します。
「v4.6.4」左側の▽をクリックすると中身が表示されます。
追加された Examples はないようです。


0 件のコメント:
コメントを投稿