ラベル clip の投稿を表示しています。 すべての投稿を表示

2015年3月26日木曜日

2 - ol3.3ex 95b - Layer clipping example 2

「layer-clipping.js(295-ol3ex.js)」は、マップを表示するための JavaScript ファイルです。

「295-ol3ex.js」
var osm = new ol.layer.Tile({
 source: new ol.source.OSM()
 /** ol.source.OSM 
  * Layer source for the OpenStreetMap tile server.
  * OpenStreetMap タイルサーバのレイヤソース。(ol3 API)
  */
});
var map = new ol.Map({
 layers: [osm],
 target: 'map',
 controls: ol.control.defaults({
 /** controls
  * Controls initially added to the map. 
  * If not specified, ol.control.defaults() is used.
  * 初期設定で、マップに追加されたコントロール。
  * 明示されていなければ、ol.control.defaults() が使用されま
  * す。(ol3 API)
  */
 /** ol.control.defaults()
  * デフォルトでは、マップに含まコントロールのセット。
  * 特に設定しない限り、これは、以下の各コントロールの
  * インスタンスを含むコレクションを返します。(ol3 API)
  * ol.control.Zoom, ol.control.Rotate, ol.control.Attribution
  */
  attributionOptions: /** @type {olx.control.AttributionOptions} */ ({
  /** @type 
   * 値のタイプ(型)の説明 - 式などで表示
   * (@use JSDoc[http://usejsdoc.org/]より)
   */
   collapsible: false // 折りたたみ
  })
 }),
 view: new ol.View({
  center: [0, 0],
  zoom: 2
 })
});
osm.on('precompose', function(event) {
/** on()
 * Listen for a certain type of event.
 * Returns: Unique key for the listener.(ol3 API)
 */
/** precompose イベント
 * レイヤを描画する前に発生するイベント。
 * (「Layer spy example」参照)
 */
 var ctx = event.context;
 /** context{CanvasRenderingContext2D} 
  * Canvas context. Only available when a Canvas 
  * renderer is used, null otherwise.
  * canvas context。キャンバスレンダラを使用する場合に
  * だけ利用でき、そうでない場合は、null。
  * (ol3 API[説明は Stable Only のチェックを外すと表示])
  */
 ctx.save();
 /** CanvasRenderingContext2D.save()
  * The CanvasRenderingContext2D.save() method of 
  * the Canvas 2D API saves the entire state of the 
  * canvas by pushing the current state onto a stack.
  * Canvas 2D API の CanvasRenderingContext2D.save()
  * メソッドは、スタック上に現在の状態を最後に追加することに
  * より、キャンバスの状態全体を保存します。
  * (MDN[https://developer.mozilla.org/en-US/docs/Web/
  * API/CanvasRenderingContext2D/save])
  */
 ctx.translate(ctx.canvas.width / 2, ctx.canvas.height / 2);
 /** CanvasRenderingContext2D.translate()
  * The CanvasRenderingContext2D.translate() method of 
  * the Canvas 2D API adds a translation transformation 
  * by moving the canvas and its origin x horizontally 
  * and y vertically on the grid.
  * Canvas 2D API の CanvasRenderingContext2D.translate()
  * メソッドは、canvas およびその元のグリッド上の x 垂直方向、
  * および y 水平方向を移動することで変換変形を追加します。
  * (MDN[https://developer.mozilla.org/en-US/docs/Web/
  * API/CanvasRenderingContext2D/translate])
  */
 ctx.scale(3, 3);
 /** CanvasRenderingContext2D.scale()
  * The CanvasRenderingContext2D.scale() method of the 
  * Canvas 2D API adds a scaling transformation to the 
  * canvas units by x horizontally and by y vertically.
  * Canvas 2D API の CanvasRenderingContext2D.scale()
  * メソッドは、x水平方向、および y 垂直方向によってキャン
  * バス単位に伸縮変形を追加します。
  * (MDN[https://developer.mozilla.org/en-US/docs/Web/
  * API/CanvasRenderingContext2D/scale])
  */
 ctx.translate(-75, -80);
 ctx.beginPath();
 /** CanvasRenderingContext2D.beginPath()
  * The CanvasRenderingContext2D.beginPath() method of 
  * the Canvas 2D API starts a new path by emptying the 
  * list of sub-paths. Call this method when you want 
  * to create a new path.
  * Canvas 2D API の CanvasRenderingContext2D.beginPath()
  * メソッドは、サブパスのリストを空にすることによって新しいパ
  * スを開始します。新しいパスを作成する場合、このメソッドを呼
  * び出します。
  * (MDN[https://developer.mozilla.org/en-US/docs/Web/
  * API/CanvasRenderingContext2D/beginPath])
  */
 ctx.moveTo(75, 40);
 /** CanvasRenderingContext2D.moveTo()
  * The CanvasRenderingContext2D.moveTo() method of the 
  * Canvas 2D API moves the starting point of a new 
  * sub-path to the (x, y) coordinates.
  * Canvas 2D API の CanvasRenderingContext2D.moveTo()
  * メソッドは、新しいサブパスの開始点を(x、y)座標に、移動
  * します。
  * (MDN[https://developer.mozilla.org/en-US/docs/Web/
  * API/CanvasRenderingContext2D/moveTo])
  */
 ctx.bezierCurveTo(75, 37, 70, 25, 50, 25);
 /** CanvasRenderingContext2D.bezierCurveTo()
  * The CanvasRenderingContext2D.bezierCurveTo() method 
  * of the Canvas 2D API adds a cubic Bézier curve to 
  * the path. It requires three points. The first two 
  * points are control points and the third one is the 
  * end point. The starting point is the last point in 
  * the current path, which can be changed using moveTo() 
  * before creating the Bézier curve.
  * Canvas 2D API の CanvasRenderingContext2D.bezierCurveTo()
  * メソッドは、三次ベジェ曲線をパスに追加します。それは3つのポイ
  * ントが必要です。最初の2点は制御点で、3つ目は終点です。始点は、
  * ベジェ曲線を作成する前の moveTo()を使用して変更することがで
  * きる、現在のパスの最後の点です。
  * (MDN[https://developer.mozilla.org/en-US/docs/Web/
  * API/CanvasRenderingContext2D/bezierCurveTo])
  */
 ctx.bezierCurveTo(20, 25, 20, 62.5, 20, 62.5);
 ctx.bezierCurveTo(20, 80, 40, 102, 75, 120);
 ctx.bezierCurveTo(110, 102, 130, 80, 130, 62.5);
 ctx.bezierCurveTo(130, 62.5, 130, 25, 100, 25);
 ctx.bezierCurveTo(85, 25, 75, 37, 75, 40);
 ctx.clip();
 /** CanvasRenderingContext2D.clip()
  * The CanvasRenderingContext2D.clip() method of the 
  * Canvas 2D API turns the path currently being built 
  * into the current clipping path.
  * Canvas 2D API の CanvasRenderingContext2D.clip()
  * メソッドは、現在組み込まれているパスを現在のクリッピン
  * グパスに置き換えます。
  * (MDN[https://developer.mozilla.org/en-US/docs/Web/
  * API/CanvasRenderingContext2D/clip])
  */
 ctx.setTransform(1, 0, 0, 1, 0, 0);
 /** CanvasRenderingContext2D.setTransform()
  * The CanvasRenderingContext2D.setTransform() method 
  * of the Canvas 2D API resets (overrides) the current 
  * transformation to the identity matrix and then 
  * invokes a transformation described by the arguments 
  * of this method.
  * Canvas 2D API の CanvasRenderingContext2D.setTransform()
  * メソッドは、現在の指定されたマトリックスへの変換をリセット
  * (オーバーライド)し、その後、このメソッドの引数によって記述
  * された変換を呼び出します。
  * (MDN[https://developer.mozilla.org/en-US/docs/Web/
  * API/CanvasRenderingContext2D/setTransform])
  */
});
osm.on('postcompose', function(event) {
/** postcompose イベント
 * レイヤを描画した後に発生するイベント。
 * (「Layer spy example」参照)
 */
 var ctx = event.context;
 ctx.restore();
 /** CanvasRenderingContext2D.restore()
  * The CanvasRenderingContext2D.restore() method of 
  * the Canvas 2D API restores the most recently 
  * saved canvas state by popping the top entry in 
  * the drawing state stack. If there is no saved 
  * state, this method does nothing.
  * Canvas 2D API の CanvasRenderingContext2D.restore()
  * メソッドは、描画状態のスタックの一番上のエントリを抜き
  * 出すことによって、最後に保存されたキャンバスの状態を復
  * 元します。全く保存された状態が存在しない場合、このメソッ
  * ドは何もしません。
  * (MDN[https://developer.mozilla.org/en-US/docs/Web/
  * API/CanvasRenderingContext2D/restore])
  */
});


2 - ol3.3ex 95a - Layer clipping example 1

「Layer clipping example (layer-clipping.html)」を参考に地図を表示してみます。

HTML ファイルの作成
a Eclipse のメニューの「ファイル」->「ファイルを開く」をクリックします。


b 「ファイルを開く」ウィンドウで、「user」->「mapsite」->「ol3proj」->「v3.3.0」->「examples」->「layer-clipping.html」をクリックして選択し、「OK」ボタンをクリックします。
同じように「layer-clipping.js」を開きます。


c メニューの「ファイル」->「新規」 -> 「ファイル」をクリックします。


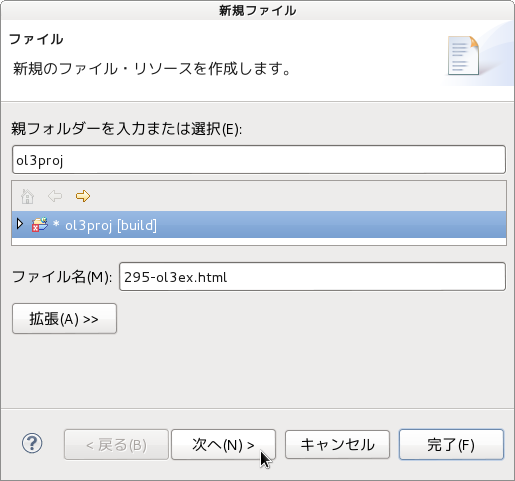
d 「ファイル」ウィンドウで「ol3proj」をクリックして選択し、「ファイル名」を「295-ol3ex.html」と入力し、「次へ」ボタンをクリックします。


e 「File Template」ウィンドウで「HTML 5 Template」をクリックして選択し、「OK」ボタンをクリックします。


f 「layer-clipping.html」の内容をコピーして「295-ol3ex.html」に貼り付け、修正します。
g 同じように、新規に「295-ol3ex.js」ファイルを作成し、「File Template」ウィンドウで「JavaScript Template」をクリックして選択し、「完了」ボタンをクリックして、「layer-clipping.js」の内容をコピーして貼り付け、修正します。「layer-clipping-require.js」も「295-ol3ex-require.js」に貼り付けます。


「295-ol3ex.html」
<!doctype html>
<html lang="en">
 <head>
  <meta charset="utf-8">
  <meta http-equiv="X-UA-Compatible" content="chrome=1">
  <meta name="viewport" content="initial-scale=1.0, user-scalable=no, width=device-width">
<!--
  <link rel="stylesheet" href="../css/ol.css" type="text/css">
  <link rel="stylesheet" href="../resources/bootstrap/css/bootstrap.min.css" type="text/css">
  <link rel="stylesheet" href="../resources/layout.css" type="text/css">
  <link rel="stylesheet" href="../resources/bootstrap/css/bootstrap-responsive.min.css" type="text/css">
-->
  <!-- ディレクトリ修正 -->
  <link rel="stylesheet" href="v3.3.0/css/ol.css" type="text/css">
  <link rel="stylesheet" href="v3.3.0/resources/bootstrap/css/bootstrap.min.css" type="text/css">
  <link rel="stylesheet" href="v3.3.0/resources/layout.css" type="text/css">
  <link rel="stylesheet" href="v3.3.0/resources/bootstrap/css/bootstrap-responsive.min.css" type="text/css">
  <title>Layer clipping example</title>
 </head>
 <body>
  <!-- 
  bootstrap.min.css, bootstrap-responsive.min.css で設定されたセレクタを使用。
  -->
  <div class="navbar navbar-inverse navbar-fixed-top">
   <div class="navbar-inner">
    <div class="container">
     <!--
     <a class="brand" href="./"><img src="../resources/logo.png"> OpenLayers 3 Examples</a>
     -->
     <!-- ディレクトリ修正 -->
     <a class="brand" href="v3.3.0/examples/"><img src="v3.3.0/resources/logo.png"> OpenLayers 3 Examples</a>
    </div>
   </div>
  </div>
  <div class="container-fluid">
   <div class="row-fluid">
    <div class="span12">
     <div id="map" class="map"></div>
    </div>
   </div>
   <div class="row-fluid">
    <div class="span12">
    <h4 id="title">Layer clipping example</h4>
     <p id="shortdesc">Layer clipping example.</p>
     <div id="docs">
      <!--
      <p>See the <a href="layer-clipping.js" target="_blank">layer-clipping.js source</a> 
       to see how this is done.</p>
      -->
      <!-- ファイル修正 -->
      <p>See the <a href="295-ol3ex.js" target="_blank">295-ol3ex.js source</a> 
       to see how this is done.</p>
     </div>
     <div id="tags">clipping, openstreetmap</div>
    </div>
   </div>
  </div>
  <!--
  <script src="../resources/jquery.min.js" type="text/javascript"></script>
  <script src="../resources/example-behaviour.js" type="text/javascript"></script>
  -->
  <!-- ディレクトリ修正
   jQuery Minified版と
   example-behaviour.js(Examples用 JSコード[文字コードなど])
  -->
  <script src="v3.3.0/resources/jquery.min.js" type="text/javascript"></script>
  <script src="v3.3.0/resources/example-behaviour.js" type="text/javascript"></script>
  <!--
  <script src="loader.js?id=layer-clipping" type="text/javascript"></script>
  -->
  <!-- ファイル修正 -->  <!-- ディレクトリ修正 -->
  <script src="loader.js?id=295-ol3ex" type="text/javascript"></script>
 </body>
</html>

2015年3月19日木曜日

2 - ol3.3ex 91b - Layer WebGL clipping example 2

「layer-clipping-webgl.js(291-ol3ex.js)」は、マップを表示するための JavaScript ファイルです。
(WebGL での描画について事前に学習しておくと理解の助けになります。))

「291-ol3ex.js」
if (!ol.has.WEBGL) {
/** ol.has.WEBGL{boolean}
 * True if browser supports WebGL.
 * ブラウザが WebGL をサポートしていたら true。(ol3 API)
 */
 var info = document.getElementById('no-webgl');
 /**
  * display error message
  */
 info.style.display = '';
} else {

 var osm = new ol.layer.Tile({
  source: new ol.source.OSM()
  /** ol.source.OSM 
   * Layer source for the OpenStreetMap tile server.
   * OpenStreetMap タイルサーバのレイヤソース。(ol3 API)
   */
 });
 var map = new ol.Map({
  layers: [osm],
  renderer: 'webgl',
  target: 'map',
  controls: ol.control.defaults({
  /** controls
   * Controls initially added to the map. 
   * If not specified, ol.control.defaults() is used.
   * 初期設定で、マップに追加されたコントロール。
   * 明示されていなければ、ol.control.defaults() が使用されま
   * す。(ol3 API)
   */
  /** ol.control.defaults()
   * デフォルトでは、マップに含まコントロールのセット。
   * 特に設定しない限り、これは、以下の各コントロールの
   * インスタンスを含むコレクションを返します。(ol3 API)
   * ol.control.Zoom, ol.control.Rotate, ol.control.Attribution
   */
   attributionOptions: /** @type {olx.control.AttributionOptions} */ ({
   /** @type 
    * 値のタイプ(型)の説明 - 式などで表示
    * (@use JSDoc[http://usejsdoc.org/]より)
    */
    collapsible: false // 折りたたみ
   })
  }),
  view: new ol.View({
   center: [0, 0],
   zoom: 2
  })
 });
 var fragmentShaderSource = [
  'precision mediump float;',
  /** precision 数値の精度を指定するためのキーワード
   * mediump 精度修飾子(中程度)
   * float フラグメントシェーダ内の float 型の数値全てに 
   *  mediump を適用
   */
  'void main() {',
  /** void main()
   * レンダリングの際に main 関数が実行
   */
  '}'
 ].join('');
 /** Array.join
  * 配列の全ての要素を繋いで文字列にします。
  * (MDN [https://developer.mozilla.org/ja/docs/Web/
  * JavaScript/Reference/Global_Objects/Array/join])
  */
 var vertexShaderSource = [
  'attribute vec2 a_position;',
  /** attribute 変数の宣言
   * vec2 変数の型(要素数が2のベクトル)
   * a_position 頂点の情報をシェーダ側で受け取る変数
   */
  /** vec系変数
   * vec2(1.0, 1.0)
   * vec3(1.0, 1.0, 1.0)
   * vec4(1.0, 1.0, 1.0, 1.0)
   */
  'void main() {',
  '  gl_Position = vec4(a_position, 0, 1);',
  /** gl_Position
   * 頂点データを渡す組み込み変数
   */
  '}'
 ].join('');
 osm.on('precompose', function(event) {
 /** on()
  * Listen for a certain type of event.
  * Returns: Unique key for the listener.(ol3 API)
  */
 /** precompose イベント
  * レイヤを描画する前に発生するイベント。
  * (「Layer spy example」参照)
  */
  var context = event.glContext;
  /** glContext()
   * WebGL context. Only available when a WebGL renderer 
   * is used, null otherwise.
   * WebGLのコンテキスト。WebGL レンダラを使用する場合にだけ
   * 利用でき、そうでない場合は null。
   * (ol3 API[説明は Stable Only のチェックを外すと表示])
   */
  var gl = context.getGL();
  /** getGL()
   * Returns: GL.
   * (ol3 API[説明は Stable Only のチェックを外すと表示])
   */
  var program = gl.createProgram();
  /** glCreateProgram()
   * Creates a program object
   * (OpenGL4 Reference Pages[https://www.opengl.org/
   * sdk/docs/man/html/glCreateProgram.xhtml])
   */
  var vertexShader = gl.createShader(gl.VERTEX_SHADER);
  /** glCreateShader()
   * Creates a shader object
   * (OpenGL4 Reference Pages[https://www.opengl.org/
   * sdk/docs/man/html/glCreateShader.xhtml])
   */
  /** GL_VERTEX_SHADER
   * A shader of type GL_VERTEX_SHADER is a shader that 
   * is intended to run on the programmable vertex 
   * processor.
   * GL_VERTEX_SHADER 型のシェーダは、プログラマブルバーテッ
   * クスプロセッサで実行することを意図しているシェーダです。
   */
  gl.shaderSource(vertexShader, vertexShaderSource);
  /** glShaderSource
   * Replaces the source code in a shader object
   * (OpenGL4 Reference Pages[https://www.opengl.org/
   * sdk/docs/man/html/glShaderSource.xhtml])
   */
  gl.compileShader(vertexShader);
  /** glCompileShader
   * Compiles a shader object
   * (OpenGL4 Reference Pages[https://www.opengl.org/
   * sdk/docs/man/html/glCompileShader.xhtml])
   */
  gl.attachShader(program, vertexShader);
  /** glAttachShader
   * Attaches a shader object to a program object
   * (OpenGL4 Reference Pages[https://www.opengl.org/
   * sdk/docs/man/html/glCompileShader.xhtml])
   */
  var fragmentShader = gl.createShader(gl.FRAGMENT_SHADER);
  /**  GL_FRAGMENT_SHADER
   * A shader of type GL_FRAGMENT_SHADER is a shader that 
   * is intended to run on the programmable fragment 
   * processor.
   * GL_FRAGMENT_SHADER 型のシェーダは、プログラマブルフラグ
   * メントプロセッサで実行することを意図しているシェーダです。
   */
  gl.shaderSource(fragmentShader, fragmentShaderSource);
  gl.compileShader(fragmentShader);
  gl.attachShader(program, fragmentShader);
  gl.linkProgram(program);
  /** glLinkProgram
   * Links a program object
   * (OpenGL4 Reference Pages[https://www.opengl.org/
   * sdk/docs/man/html/glLinkProgram.xhtml])
   */
  context.useProgram(program);
  /** glUseProgram
   * Installs a program object as part of current 
   * rendering state
   * (OpenGL4 Reference Pages[https://www.opengl.org/
   * sdk/docs/man/html/glUseProgram.xhtml])
   */
  var positionLocation = gl.getAttribLocation(program, 'a_position');
  /** glGetAttribLocation
   * Returns the location of an attribute variable
   * (OpenGL4 Reference Pages[https://www.opengl.org/
   * sdk/docs/man/html/glGetAttribLocation.xhtml])
   */
  gl.enable(gl.STENCIL_TEST);
  /** glEnable
   * enable or disable server-side GL capabilities
   * (OpenGL4 Reference Pages[https://www.opengl.org/
   * sdk/docs/man/html/glEnable.xhtml])
   */
  /** GL_STENCIL_TEST
   * If enabled, do stencil testing and update the 
   * stencil buffer.
   * 有効なら、ステンシルテストを実行し、ステンシルバッファを
   * 更新します。
   */
  gl.colorMask(false, false, false, false);
  /** glColorMask
   * enable and disable writing of frame buffer color 
   * components
   * (OpenGL4 Reference Pages[https://www.opengl.org/
   * sdk/docs/man/html/glColorMask.xhtml])
   */
  gl.stencilOp(gl.KEEP, gl.KEEP, gl.REPLACE);
  /** glStencilOp
   * set front and back stencil test actions
   * (OpenGL4 Reference Pages[https://www.opengl.org/
   * sdk/docs/man/html/glStencilOp.xhtml])
   */
  /** GL_KEEP
   * Keeps the current value.
   * 現在の値を保持します。
   */
  /** GL_REPLACE
   * Sets the stencil buffer value to ref, as specified 
   * by glStencilFunc. 
   * ステンシルバッファ値を glStencilFunc によって指定された
   * リファレンスに設定します。
   */
  gl.stencilFunc(gl.ALWAYS, 1, 0xff);
  /** glStencilFunc
   * set front and back function and reference value for 
   * stencil testing
   * (OpenGL4 Reference Pages[https://www.opengl.org/
   * sdk/docs/man/html/glStencilFunc.xhtml])
   */
  /** GL_ALWAYS
   * Always passes. 常に通します。
   */
  var buffer = gl.createBuffer();
  gl.bindBuffer(gl.ARRAY_BUFFER, buffer);
  /** glBindBuffer
   * bind a named buffer object
   * (OpenGL4 Reference Pages[https://www.opengl.org/
   * sdk/docs/man/html/glBindBuffer.xhtml])
   */
  /** GL_ARRAY_BUFFER
   * Vertex attributes 
   */
  gl.bufferData(gl.ARRAY_BUFFER, new Float32Array([
  /** glBufferData
   * creates and initializes a buffer object's data store
   * (OpenGL4 Reference Pages[https://www.opengl.org/
   * sdk/docs/man/html/glBufferData.xhtml])
   */
  /** Float32Array
   * Float32Array タイプは、32 ビット浮動小数点数 (C 言語
   * の float データタイプに相当します) の配列を表します。
   * これが設定されると、オブジェクトのメソッドあるいは配列の
   * 添字構文 (括弧を用いる表記) を用いて、配列の要素を参照す
   * ることが可能になります。
   * (MDN[https://developer.mozilla.org/ja/docs/Web/
   * JavaScript/Typed_arrays/Float32Array])
   */
    // first band
    -1.0, -1.0, -0.75, -1.0, -1.0, 1.0,
    -1.0, 1.0, -0.75, -1.0, -0.75, 1.0,
    // second band
    -0.5, -1.0, -0.25, -1.0, -0.5, 1.0,
    -0.5, 1.0, -0.25, -1.0, -0.25, 1.0,
    // third band
    0.0, -1.0, 0.25, -1.0, 0.0, 1.0,
    0.0, 1.0, 0.25, -1.0, 0.25, 1.0,
    // forth band
    0.5, -1.0, 0.75, -1.0, 0.5, 1.0,
    0.5, 1.0, 0.75, -1.0, 0.75, 1.0
  ]), gl.STATIC_DRAW);
  /** STATIC
   * The data store contents will be modified once and 
   * used many times.
   * データストアコンテンツは、一度および使用された多くの回数
   * 修正されます。
   * DRAW
   * The data store contents are modified by the 
   * application, and used as the source for GL drawing 
   * and image specification commands.
   * データストアコンテンツは、アプリケーションによって修正さ
   * れ、GL 描画とイメージ仕様コマンドのソースとして使用され
   * ます。
   */
  gl.enableVertexAttribArray(positionLocation);
  /** glEnableVertexAttribArray
   * Enable or disable a generic vertex attribute array
   * (OpenGL4 Reference Pages[https://www.opengl.org/
   * sdk/docs/man/html/glEnableVertexAttribArray.xhtml])
   */
  gl.vertexAttribPointer(positionLocation, 2, gl.FLOAT, false, 0, 0);
  /** glVertexAttribPointer
   * define an array of generic vertex attribute data
   * (OpenGL4 Reference Pages[https://www.opengl.org/
   * sdk/docs/man/html/glVertexAttribPointer.xhtml])
   */
  gl.drawArrays(gl.TRIANGLES, 0, 24);
  /** glDrawArrays
   * render primitives from array data
   * (OpenGL4 Reference Pages[https://www.opengl.org/
   * sdk/docs/man/html/glDrawArrays.xhtml])
   */
  gl.bindBuffer(gl.ARRAY_BUFFER, null);
  gl.deleteBuffer(buffer);
  /** glDeleteBuffers
   *  delete named buffer objects
   * (OpenGL4 Reference Pages[https://www.opengl.org/
   * sdk/docs/man/html/glDeleteBuffers.xhtml])
   */
  gl.colorMask(true, true, true, true);
  gl.stencilFunc(gl.NOTEQUAL, 0, 0xff);
  /** GL_NOTEQUAL
   * Passes if ( ref & mask ) != ( stencil & mask ). 
   */
  gl.stencilOp(gl.KEEP, gl.KEEP, gl.KEEP);
 });
 osm.on('postcompose', function(event) {
 /** postcompose イベント
  * レイヤを描画した後に発生するイベント。
  * (「Layer spy example」参照)
  */
  var context = event.glContext;
  var gl = context.getGL();
  gl.disable(gl.STENCIL_TEST);
  /** glDisable
   * enable or disable server-side GL capabilities
   * (OpenGL4 Reference Pages[https://www.opengl.org/
   * sdk/docs/man/html/glEnable.xhtml])
   */
 });
}

2 - ol3.3ex 91a - Layer WebGL clipping example 1

「Layer WebGL clipping example (layer-clipping-webgl.html)」を参考に地図を表示してみます。
説明に次のようにあります。

This example shows how to use the precompose and postcompose rendering hooks to clip layers using WebGL.
この例では、WebGL を利用してレイヤをクリップするフックをレンダリングするために precompose と postcompose を使用する方法を示しています。


HTML ファイルの作成
a Eclipse のメニューの「ファイル」->「ファイルを開く」をクリックします。


b 「ファイルを開く」ウィンドウで、「user」->「mapsite」->「ol3proj」->「v3.3.0」->「examples」->「layer-clipping-webgl.html」をクリックして選択し、「OK」ボタンをクリックします。
同じように「layer-clipping-webgl.js」を開きます。


c メニューの「ファイル」->「新規」 -> 「ファイル」をクリックします。


d 「ファイル」ウィンドウで「ol3proj」をクリックして選択し、「ファイル名」を「291-ol3ex.html」と入力し、「次へ」ボタンをクリックします。


e 「File Template」ウィンドウで「HTML 5 Template」をクリックして選択し、「OK」ボタンをクリックします。


f 「layer-clipping-webgl.html」の内容をコピーして「291-ol3ex.html」に貼り付け、修正します。
g 同じように、新規に「291-ol3ex.js」ファイルを作成し、「File Template」ウィンドウで「JavaScript Template」をクリックして選択し、「完了」ボタンをクリックして、「layer-clipping-webgl.js」の内容をコピーして貼り付け、修正します。「layer-clipping-webgl-require.js」も「291-ol3ex-require.js」に貼り付けます。


「291-ol3ex.html」
<!doctype html>
<html lang="en">
 <head>
  <meta charset="utf-8">
  <meta http-equiv="X-UA-Compatible" content="chrome=1">
  <meta name="viewport" content="initial-scale=1.0, user-scalable=no, width=device-width">
<!--
  <link rel="stylesheet" href="../css/ol.css" type="text/css">
  <link rel="stylesheet" href="../resources/bootstrap/css/bootstrap.min.css" type="text/css">
  <link rel="stylesheet" href="../resources/layout.css" type="text/css">
  <link rel="stylesheet" href="../resources/bootstrap/css/bootstrap-responsive.min.css" type="text/css">
-->
  <!-- ディレクトリ修正 -->
  <link rel="stylesheet" href="v3.3.0/css/ol.css" type="text/css">
  <link rel="stylesheet" href="v3.3.0/resources/bootstrap/css/bootstrap.min.css" type="text/css">
  <link rel="stylesheet" href="v3.3.0/resources/layout.css" type="text/css">
  <link rel="stylesheet" href="v3.3.0/resources/bootstrap/css/bootstrap-responsive.min.css" type="text/css">
  <title>Layer WebGL clipping example</title>
 </head>
 <body>
  <!-- 
  bootstrap.min.css, bootstrap-responsive.min.css で設定されたセレクタを使用。
  -->
  <div class="navbar navbar-inverse navbar-fixed-top">
   <div class="navbar-inner">
    <div class="container">
     <!--
     <a class="brand" href="./"><img src="../resources/logo.png"> OpenLayers 3 Examples</a>
     -->
     <!-- ディレクトリ修正 -->
     <a class="brand" href="v3.3.0/examples/"><img src="v3.3.0/resources/logo.png"> OpenLayers 3 Examples</a>
    </div>
   </div>
  </div>
  <div class="container-fluid">
   <div class="row-fluid">
    <div class="span12">
     <div id="map" class="map"></div>
    </div>
   </div>
   <div id="no-webgl" class="alert alert-error" style="display: none">
    This example requires a browser that supports 
    <a href="http://get.webgl.org/">WebGL</a>.
   </div>
   <div class="row-fluid">
    <div class="span12">
    <h4 id="title">Layer WebGL clipping example</h4>
     <p id="shortdesc">Layer WebGL clipping example.</p>
     <div id="docs">
      <p>This example shows how to use the 
       <code>precompose</code> and 
       <code>postcompose</code> rendering hooks to 
       clip layers using WebGL.</p>
      <!--
      <p>See the <a href="layer-clipping-webgl.js" target="_blank">layer-clipping-webgl.js source</a> 
       to see how this is done.</p>
      -->
      <!-- ファイル修正 -->
      <p>See the <a href="291-ol3ex.js" target="_blank">291-ol3ex.js source</a> 
       to see how this is done.</p>
     </div>
     <div id="tags">clipping, webgl, openstreetmap</div>
    </div>
   </div>
  </div>
  <!--
  <script src="../resources/jquery.min.js" type="text/javascript"></script>
  <script src="../resources/example-behaviour.js" type="text/javascript"></script>
  -->
  <!-- ディレクトリ修正
   jQuery Minified版と
   example-behaviour.js(Examples用 JSコード[文字コードなど])
  -->
  <script src="v3.3.0/resources/jquery.min.js" type="text/javascript"></script>
  <script src="v3.3.0/resources/example-behaviour.js" type="text/javascript"></script>
  <!--
  <script src="loader.js?id=layer-clipping-webgl" type="text/javascript"></script>
  -->
  <!-- ファイル修正 -->  <!-- ディレクトリ修正 -->
  <script src="loader.js?id=291-ol3ex" type="text/javascript"></script>
 </body>
</html>