KMLは、Googleが開発した地理情報を表現するマークアップ言語で、現在はOGCの管理で運用されています。
OGCのサイトによると、その特徴は、Webマッピングで、モバイル地図(2次元)[Googleマップなど]と地球ブラウザ(3次元)[Googleアースなど]での地理的な注釈やデータの可視化です。
KMLについて、Google Earth の「KML のサンプル」を参考にしてみてみます。
<?xml version="1.0" encoding="UTF-8"?>
これがXML文章であるという「XML宣言」です。
<?xml バージョン 文字のエンコード ?> という内容です。
<kml xmlns="http://earth.google.com/kml/2.1">
これは「名前空間」で、KMLでは必ずこれを入力します。
<Placemark>
Google Earth の「目印」は、<Point> という「子」を持つ <Placemark>要素で表示されます。
<Placemark> には、LineString、Polygon、Model などの図形要素を1つ以上設定できるようです。
<Placemark> の子は
<name>:<Placemark> の「名前」。Google Earth では、目印のラベル。
<description>:<Placemark> の「記述(内容)」。Google Earth では、目印のバルーン。
<Point>:<Placemark> の「点」の位置。
<coordinates>:座標
になります。
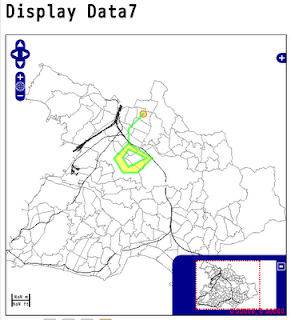
地図上の表示は「Point(点)」になります。
Google マップでの KML のリファレンスが Google code にあります。
Google マップ上での動作なので、OpenLayers では動作しないものがありますので注意してください。
<?xml version="1.0" encoding="UTF-8"?>
<kml xmlns="http://earth.google.com/kml/2.1">
 <Placemark>
  <name>Simple placemark</name>
  <description>Attached to the ground. Intelligently places itself
   at the height of the underlying terrain.</description>
  <Point>
   <coordinates>-26659.018612,-71776.660019</coordinates>
  </Point>
 </Placemark>
</kml>
LineString の例
<Style id="greenLineYellowPoly"> <!-- StyleMap や Feature で参照できる、呼び出し可能なスタイル グループを定義 -->
 <LineStyle> <!-- 線形状の描画スタイル(色、色モード、線の幅)を指定 -->
   <color>7f00ff00</color> <!-- αRGB -->
   <width>4</width> <!-- 線の幅(ピクセル単位)-->
 </LineStyle>
 <PolyStyle> <!-- ポリゴンの描画スタイルを指定 -->
   <color>7f00ffff</color>
 </PolyStyle>
</Style>
<Placemark>
 <name>Absolute Extruded</name>
 <description>Transparent yellow wall with green outlines</description>
 <styleUrl>#greenLineYellowPoly</styleUrl> <!-- Document で定義されている <Style> または <StyleMap> の URL -->
 <LineString> <!-- 連結された一連の線を定義 -->
   <extrude>1</extrude> <!-- ブール値。LinearRing を地面に接続するかどうかを指定 -->
   <tessellate>1</tessellate> <!-- ブール値。LinearRing を地形に合わせて表示するかどうかを指定 -->
   <altitudeMode>absolute</altitudeMode> <!-- <coordinates> 要素内の標高コンポーネントの解釈方法を指定 -->
   <!-- absolute: 要素の下にある地形の実際の高度に関係なく、座標の標高を海面に対して相対的に設定 -->
   <coordinates> -26659.018612,-71776.660019,2357
     -27159.018612,-72276.660019,2357
     -27159.018612,-72776.660019,2357
   </coordinates>
 </LineString>
</Placemark>
Polygon の例
<Placemark>
 <name>The Pentagon</name>
 <styleUrl>#greenLineYellowPoly</styleUrl>
 <Polygon> <!-- 外側の境界と、0 または 1 つ以上の内側の境界を指定することによって定義 -->
  <extrude>1</extrude>
  <altitudeMode>relativeToGround</altitudeMode>
  <!-- relativeToGround: 要素の標高を、特定の場所の実際の高度に対して相対的に設定 -->
  <outerBoundaryIs> <!-- 外周 -->
   <LinearRing> <!-- 閉じた折れ線を定義 -->
    <coordinates>
     -27159.018612,-72776.660019,100
     -27659.018612,-73276.660019,100
     -27359.018612,-73776.660019,100
     -26859.018612,-73776.660019,100
     -26359.018612,-73276.660019,100
     -27159.018612,-72776.660019,100
    </coordinates>
   </LinearRing>
  </outerBoundaryIs>
  <innerBoundaryIs><!-- 内周 -->
   <LinearRing>
    <coordinates>
     -27159.018612,-72976.660019,100
     -27359.018612,-73276.660019,100
     -27159.018612,-73576.660019,100
     -27159.018612,-73576.660019,100
     -26559.018612,-73276.660019,100
     -27159.018612,-72976.660019,100
    </coordinates>
   </LinearRing>
  </innerBoundaryIs>
 </Polygon>
</Placemark>
次のスクリプトを追加します。
 // ここから追加
 map.addLayer(new OpenLayers.Layer.GML("KML", "kml_point.kml",
  {
   format: OpenLayers.Format.KML,
   formatOptions: {
    extractStyles: true,
    extractAttributes: true
   }
  }));
 // ここまで
} // End of function init()


0 件のコメント:
コメントを投稿