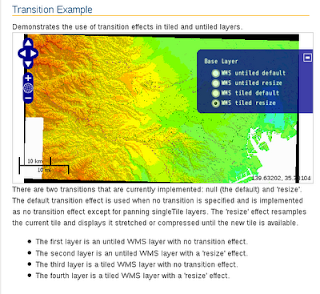
地図を実際に表示してみるとわかりますが、transition effect で 'resize' を設定していると、拡大した直後は今まで表示されていた画像が引き伸ばされ、新しい画像が生成すると入れ替わります。
HTML ファイルを新規作成します。
「openlayersTokyoproj」 を右クリックして 新規 -> HTML ファイル をクリック。
「HTML ファイル」ウィンドウの「ファイル名(任意:openlayers_transition.html)」に入力して「完了」ボタンをクリック。
「charset」を「utf-8」にします。
「examples」の「transition.html」の内容をコピーして新規作成したファイルに貼り付けます。
コードの修正とちょっと解説します。
<html xmlns="http://www.w3.org/1999/xhtml">
 <head>
  <meta http-equiv="Content-Type" content="text/html; charset=utf-8">
  <title>OpenLayers36 Transitions</title>
  <link rel="stylesheet" href="./theme/default/style.css" type="text/css" />
  <link rel="stylesheet" href="./examples/style.css" type="text/css" />

<!-- OpenLayers ライブラリ -->
  <script src="./lib/Firebug/firebug.js"></script>
  <script src="./lib/OpenLayers.js"></script>

<!-- Proj4js ライブラリ -->
  <script type="text/javascript" src="./lib/proj4js/lib/proj4js-compressed.js"></script>
  <script type="text/javascript" src="./lib/proj4js/lib/projCode/tmerc.js"></script>
  <script type="text/javascript" src="./lib/proj4js/lib/defs/EPSG2456.js"></script>
<!-- Transition のコード -->
  <script type="text/javascript">
   var map;
   function init(){
// ここから追加
    map = new OpenLayers.Map('mapDiv', {
     projection: new OpenLayers.Projection("EPSG:2456"),
     displayProjection: new OpenLayers.Projection("EPSG:4326"),
     maxResolution: 'auto',
     units: 'meters',
     maxExtent: new OpenLayers.Bounds(-279000,1054000,-185000,1104000)
    });
// ここまで
// 地図を東京に変更
    var single_default_effect = new OpenLayers.Layer.WMS(
     "WMS untiled default",
     "http://192.168.1.6/cgi-bin/mapserv?",
     {
      map: '/home/user/mapfile/tokyo_bmi_pgis_img2.map',
      layers: 'height',
      format: 'image/png'
     },
     {singleTile: true}
    );
    var single_resize_effect = new OpenLayers.Layer.WMS(
     "WMS untiled resize",
     "http://192.168.1.6/cgi-bin/mapserv?",
     {
      map: '/home/user/mapfile/tokyo_bmi_pgis_img2.map',
      layers: 'height',
      format: 'image/png'
     },
     {singleTile: true, transitionEffect: 'resize'}
    );
    var tiled_default_effect = new OpenLayers.Layer.WMS(
     "WMS tiled default ",
     "http://192.168.1.6/cgi-bin/mapserv?",
     {
      map: '/home/user/mapfile/tokyo_bmi_pgis_img2.map',
      layers: 'height',
      format: 'image/png'
     }
    );
    var tiled_resize_effect = new OpenLayers.Layer.WMS(
     "WMS tiled resize",
     "http://192.168.1.6/cgi-bin/mapserv?",
     {
      map: '/home/user/mapfile/tokyo_bmi_pgis_img2.map',
      layers: 'height',
      format: 'image/png'
     },
     {transitionEffect: 'resize'}
    );

    map.addLayers([single_default_effect, single_resize_effect, tiled_default_effect, tiled_resize_effect]);
    map.addControl(new OpenLayers.Control.LayerSwitcher());
    map.addControl(new OpenLayers.Control.MousePosition()); // 追加
    map.addControl(new OpenLayers.Control.ScaleLine());     // 追加
//  map.setCenter(new OpenLayers.LonLat(6.5, 40.5), 4);
    map.zoomToMaxExtent();

   } End of function init()
  </script>
 </head>
<!-- body 部分 -->
 <body onload="init()">
  <h1 id="title">Transition Example</h1>
  <p id="shortdesc">
   Demonstrates the use of transition effects in tiled and untiled layers.
  </p>
  <div id="mapDiv" class="smallmap"></div>
  <div id="docs">
   There are two transitions that are currently implemented: null (the
   default) and 'resize'.  The default transition effect is used when no
   transition is specified and is implemented as no transition effect except
   for panning singleTile layers.  The 'resize' effect resamples the current
   tile and displays it stretched or compressed until the new tile is available.
   <ul>
    <li>The first layer is an untiled WMS layer with no transition effect.</li>
    <li>The second layer is an untiled WMS layer with a 'resize' effect. </li>
    <li>The third layer is a tiled WMS layer with no transition effect. </li>
    <li>The fourth layer is a tiled WMS layer with a 'resize' effect. </li>
   </ul>
  </div>
 </body>
</html>

説明を訳してみました。
現在、実装されている2つのトランジションがあります。:null(デフォルト)と'リサイズ'です。
デフォルトのトランジション効果は、singleTileレイヤのパンを除いて、トランジション効果がないと同時に、指定されたり実装されているトランジションがないときに使用されます。
'resize'効果は、新しいタイルを利用できるまで、現在のタイルをリサンプリングし、伸張または圧縮されたタイルを表示します。
第1レイヤは、トランジション効果のないアンタイル WMS レイヤです。
第2レイヤは、リサイズ効果のアンタイル WMS レイヤです。
第3レイヤは、トランジション効果のないタイル WMS レイヤです。
第4レイヤは、リサイズ効果のタイル WMS レイヤです。

0 件のコメント:
コメントを投稿