HTML ファイルを新規作成します。
「openlayersTokyoproj」 を右クリックして 新規 -> HTML ファイル をクリック。
「HTML ファイル」ウィンドウの「ファイル名(任意:openlayers_teleportation.html)」に入力して「完了」ボタンをクリック。
「charset」を「utf-8」にします。
「examples」の「teleportation.html」の内容をコピーして新規作成したファイルに貼り付けます。
コードの修正とちょっと解説します。
<html xmlns="http://www.w3.org/1999/xhtml">
 <head>
  <meta http-equiv="Content-Type" content="text/html; charset=utf-8">
  <title>OpenLayers38 Map Teleportation</title>
  <link rel="stylesheet" href="./theme/default/style.css" type="text/css" />
  <link rel="stylesheet" href="./examples/style.css" type="text/css" />

<!-- OpenLayers ライブラリ -->
  <script src="./lib/Firebug/firebug.js"></script>
  <script src="./lib/OpenLayers.js"></script>

<!-- Proj4js ライブラリ -->
  <script type="text/javascript" src="./lib/proj4js/lib/proj4js-compressed.js"></script>
  <script type="text/javascript" src="./lib/proj4js/lib/projCode/tmerc.js"></script>
  <script type="text/javascript" src="./lib/proj4js/lib/defs/EPSG2456.js"></script>
<!-- マップのスタイル -->
  <style type="text/css">
   #wrapper {
    position: relative;
   }
   .spot1 {
    width: 250px;
   }
   .spot2 {
    width: 300px;
    position: absolute;
    left: 300px;
    top: 0;
   }
  </style>
<!-- Transportation のコード -->
  <script type="text/javascript">
   var map, layer1, layer2, spot=1; // 修正
   function init(){
// 東京都用 map の設定
    mapOptions = {
     div: "spot1",
     projection: new OpenLayers.Projection("EPSG:2456"),
     displayProjection: new OpenLayers.Projection("EPSG:4326"),
     maxResolution: 183.593750,
     units: 'meters',
     maxExtent: new OpenLayers.Bounds(-279000,1054000,-185000,1104000)
    };
    map = new OpenLayers.Map(mapOptions);
// 東京都区画レイヤ
    layer1 = new OpenLayers.Layer.WMS( "Tokyo Height WMS",
     "http://192.168.1.6/cgi-bin/mapserv?",
     {
      map: '/home/user/mapfile/tokyo_bmi_pgis_img.map',
      layers: 'height',
      format: 'image/png'
     });
    layer2 = new OpenLayers.Layer.WMS( "Tokyo Kukaku Sen WMS",
     "http://192.168.1.6/cgi-bin/mapserv?",
     {
      map: '/home/user/mapfile/tokyo_bmi_pgis_img2.map',
      layers: 'kukaku',
      transparent: true,
      format: 'image/png'
     });

    map.addLayers([layer1, layer2]);
    map.zoomToMaxExtent();
// unit がメータのときの Overview の設定
    var controlOptions = {
     mapOptions: mapOptions
    };
    var overview = new OpenLayers.Control.OverviewMap(controlOptions);
    map.addControl(overview);
    overview.maximizeControl();

    map.addControl(new OpenLayers.Control.LayerSwitcher()); // 追加
    map.addControl(new OpenLayers.Control.MousePosition()); // 追加
    map.addControl(new OpenLayers.Control.ScaleLine());     // 追加
// ここまで
   } // End of function init()
// テレポートのコード
   function teleport() {
    if (spot == 1) {
     spot = 2;
    } else {
     spot = 1;
    }
   map.render("spot" + spot);
   }

  </script>
 </head>
<!-- body のコード -->
 <body onload="init()">
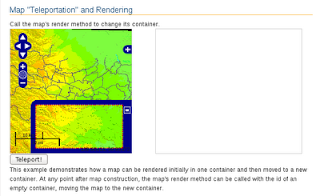
  <h1 id="title">Map "Teleportation" and Rendering</h1>
  <div id="tags"></div>
  <p id="shortdesc">Call the map's render method to change its container.</p>
  <div id="wrapper">
   <div id="spot1" class="smallmap spot1"></div>
   <div id="spot2" class="smallmap spot2"></div>
<!-- スタイルシートを2つ設定 -->
  </div>
  <input type="button" onclick="teleport()" value="Teleport!"></input>
  <div id="docs">
    This example demonstrates how a map can be rendered initially in one
   container and then moved to a new container.  At any point after map
   construction, the map's render method can be called with the id of
   an empty container, moving the map to the new container.
  </div>
 </body>
</html>

説明を訳してみました。
地図のコンテナを変更する render メソッドを呼び出します。
この例では、地図がどのように最初に1つのコンテナにレンダリングすることができ、それから新しいコンテナに移動するかを示します。地図の構築後、すべてのポイントで、マップのレンダリング方法が空のコンテナのidで呼び出すことができ、マップを新しいコンテナに移動します。

0 件のコメント:
コメントを投稿