
point と line、polygon は、別々のレイヤにして保存します。
GeoServer に新しいレイヤを作成します。レイヤは次のようにします。
(akiruno_polygon はすでに設定してあります。)
Layer(Type) Name  Default Style(WMS Setting)  attribute
akiruno_point     point                       Multi point
akiruno_line      line                        Multi lin
akiruno_polygon   polygon                     Multi polygon
次の設定は各レイヤ共通です。
Workspace  Store  Enabled?  Declare SRS
npn        bmi    cheked    EPSG:2451
Min X:  Min Y:  Max X:  Max Y:
-63100  -34500  -45400  -24200
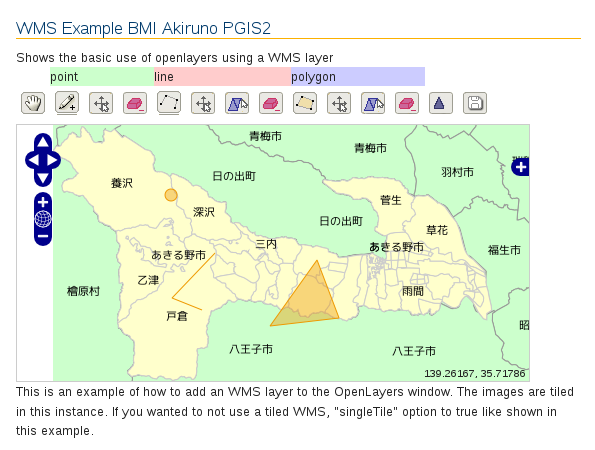
レイヤが複数になるとコントロール機能(drag や modify など)がうまく機能できませんでした。
drag, modyfy, delete コントロールのボタンを各レイヤ用に設定します。
「ol016-nippon_bmi_akiruno_pgis.html」 ファイルを続けて使います。
OpenLayers の Development Examples の「OpenLayers EditingToolbar Outside Viewport(http://openlayers.org/dev/examples/editingtoolbar-outside.html)」を参考にします。
akiruno_line と akiruno_poygon のレイヤを設定します。
---
var map, layer0, layer1, layer2, layer3, layer4, akirunoPoint, akirunoLine, akirunoPolygon, vectors;
// akirunoPoint, akirunoLine, akirunoPolygon 追加
var j, saveStrategy =[]; // 追加
---
// var saveStrategy = new OpenLayers.Strategy.Save(); // 削除
// ここから追加
 for(j = 0; j < 3; j++) {
  saveStrategy[j] = new OpenLayers.Strategy.Save();
 };
// ここまで
 akirunoPoint = new OpenLayers.Layer.Vector("Akiruno Point", {
  strategies: [new OpenLayers.Strategy.BBOX(), saveStrategy[0]],
  projection: new OpenLayers.Projection("EPSG:2451"),
protocol: new OpenLayers.Protocol.WFS({
   version: "1.1.0",
   srsName: "EPSG:2451",
   url: "http://192.168.1.200:8080/geoserver/wfs",
   featureNS :  "http://www.myhome.net/npn",
   featureType: "akiruno_point",
   geometryName: "the_geom",
   schema: "http://192.168.1.200:8080/geoserver/wfs/DescribeFeatureType?version=1.1.0&typename=npn:akiruno_point"
  })
 });
 akirunoLine = new OpenLayers.Layer.Vector("Akiruno Line", {
  strategies: [new OpenLayers.Strategy.BBOX(), saveStrategy[1]],
  projection: new OpenLayers.Projection("EPSG:2451"),
  protocol: new OpenLayers.Protocol.WFS({
   version: "1.1.0",
   srsName: "EPSG:2451",
   url: "http://192.168.1.200:8080/geoserver/wfs",
   featureNS :  "http://www.myhome.net/npn",
   featureType: "akiruno_line",
   geometryName: "the_geom",
   schema: "http://192.168.1.200:8080/geoserver/wfs/DescribeFeatureType?version=1.1.0&typename=npn:akiruno_line"
  })
 });
 akirunoPolygon = new OpenLayers.Layer.Vector("Akiruno Polygon", {
  strategies: [new OpenLayers.Strategy.BBOX(), saveStrategy[2]],
  projection: new OpenLayers.Projection("EPSG:2451"),
  protocol: new OpenLayers.Protocol.WFS({
   version: "1.1.0",
   srsName: "EPSG:2451",
   url: "http://192.168.1.200:8080/geoserver/wfs",
   featureNS :  "http://www.myhome.net/npn",
   featureType: "akiruno_polygon",
   geometryName: "the_geom",
   schema: "http://192.168.1.200:8080/geoserver/wfs/DescribeFeatureType?version=1.1.0&typename=npn:akiruno_polygon"
  })
 });
// ここまで
 map = new OpenLayers.Map('map', {
  projection: new OpenLayers.Projection("EPSG:2451"),
  displayProjection: new OpenLayers.Projection("EPSG:4326"),
maxResolution: 'auto',
  units: 'meters',
  maxExtent: new OpenLayers.Bounds(-63100,-34500,-45400,-24200),
  controls: [
   new OpenLayers.Control.PanZoom(),
   new OpenLayers.Control.LayerSwitcher(),
   new OpenLayers.Control.MousePosition()
  ]
 });
 map.addLayers([layer0, layer3, layer1, layer2, layer4, akirunoPoint, akirunoLine, akirunoPolygon]);
 // "vectors" を削除 "akiruno_point, akiruno_line, akiruno_polygon" を追加
 var container = document.getElementById("panel");
 // 追加 編集ボタンを地図の外に配置するため
 var panel = new OpenLayers.Control.Panel({ //追加
  displayClass: 'customEditingToolbar',
  allowDepress: true,
  div: container // 追加
 });
vectors = [akirunoPoint, akirunoLine, akirunoPolygon]; //追加
 panelControl = [
  new OpenLayers.Control.Navigation(
  {
   title: "Navigation"
  }),

 new OpenLayers.Control.DrawFeature(
  vectors[0],
  OpenLayers.Handler.Point,
  {
   title: "Draw Point",
   displayClass: 'olControlDrawFeaturePoint',
   multi: true
 }),
 new OpenLayers.Control.DragFeature(
  vectors[0],
  {
   title: "Drag Feature",
   displayClass: 'olControlDragFeature'
 }),
 new DeleteFeature(
  vectors[0],
  {
   title: "Remove Feature",
   displayClass: "olControlDeleteFeature"
 }),
 new OpenLayers.Control.DrawFeature(
  vectors[1],
  OpenLayers.Handler.Path,
  {
   title: "Draw Line",
   displayClass: 'olControlDrawFeaturePath',
   multi: true
 }),
 new OpenLayers.Control.DragFeature(
  vectors[1],
  {
   title: "Drag Feature",
   displayClass: 'olControlDragFeature'
 }),
 new OpenLayers.Control.ModifyFeature(
  vectors[1],
  {
   title: "Modify Feature",
   displayClass: "olControlModifyFeature"
 }),
 new DeleteFeature(
  vectors[1],
  {
   title: "Remove Feature",
   displayClass: "olControlDeleteFeature"
 }),
 new OpenLayers.Control.DrawFeature(
  vectors[2],
  OpenLayers.Handler.Polygon,
  {
   title: "Draw Polygon",
   displayClass: 'olControlDrawFeaturePolygon',
   multi: true
 }),
 new OpenLayers.Control.DragFeature(
  vectors[2],
  {
   title: "Drag Feature",
   displayClass: 'olControlDragFeature'
 }),
 new OpenLayers.Control.ModifyFeature(
  vectors[2],
  {
   title: "Modify Feature",
   displayClass: "olControlModifyFeature"
 }),
 new DeleteFeature(
  vectors[2],
  {
   title: "Remove Feature",
   displayClass: "olControlDeleteFeature"
 }),

 new OpenLayers.Control.SelectFeature(
  vectors,
  {
   clickout: false, toggle: false,
   multiple: false, hover: false,
   toggleKey: "ctrlKey", // ctrl key removes from selection
   multipleKey: "shiftKey", // shift key adds to selection
   box: true,
   title: "Select Feature",
   displayClass: 'olControlSelectFeature'
 }),

 new OpenLayers.Control.Button({
  title: "Save Changes",
  trigger: function() {
   for(j = 0; j < 3; j++) {
    window.alert(j);
    saveStrategy[j].save();
   };
  },
  displayClass: "olControlSaveFeatures"
 })
];
// ここまで

panel.addControls(panelControl);
map.addControl(panel);

map.zoomToMaxExtent();
}
---EditingToolbar を次の図のように、各レイヤごとにボタンを設定しました。
「background: -webkit-linear-gradient」は、対応していないブラウザがあります。
スタイルシートを次のように設定します。
<!DOCTYPE html>
<html>
 <head>
  <meta http-equiv="Content-Type" content="text/html; charset=utf-8">
  <meta name="viewport" content="width=device-width, initial-scale=1.0, maximum-scale=1.0, user-scalable=0">
  <meta name="apple-mobile-web-app-capable" content="yes">
  <link rel="stylesheet" href="OpenLayers-2.13.1/theme/default/style.css" type="text/css">
  <link rel="stylesheet" href="OpenLayers-2.13.1/examples/style.css" type="text/css">
  <style>
   .customEditingToolbar {
    float: left;
    right: 0px;
    height: 30px;
    background: -webkit-linear-gradient(left, #ffffff 0px, #ffffff 35px, #ccffcc 35px, #ccffcc 138px, #ffcccc 138px, #ffcccc 275px, #ccccff 275px, #ccccff 409px, #ffffff 409px, #ffffff);
   }
   .customEditingToolbar div {
    float: left;
    margin: 5px;
    width: 24px;
    height: 24px;
   }
   .pointpanel
   {
    position: absolute;
    left: 53px;
    background-color: #ccffcc;
    width: 104px;
   }
   .linepanel
   {
    position: absolute;
    left: 157px;
    background-color: #ffcccc;
    width: 137px;
   }
   .polygonpanel
   {
    position: absolute;
    left: 294px;
    background-color: #ccccff;
    width: 134px;
   }
---
 <body onload="init()">
  <h1 id="title">WMS Example BMI Akiruno PGIS2</h1>

  <div id="tags">
   wms, layer, singletile
  </div>
  <p id="shortdesc">
   Shows the basic use of openlayers using a WMS layer
  </p>
  <div class="pointpanel">point</div><div class="linepanel">line</div><div class="polygonpanel">polygon</div><br />
  <div id="panel" class="customEditingToolbar"> </div>
  <br /><br />
  <div id="map" class="smallmap"> </div>
  <div id="docs">
   <p>This is an example of how to add an WMS layer to the OpenLayers
      window. The images are tiled in this instance. If you wanted to not use
      a tiled WMS, "singleTile" option to true like shown in this example.</p>
  </div>
 </body>
</html>
参考 HTML ファイルol016-nippon_bmi_akiruno_pgis.html
0 件のコメント:
コメントを投稿