Introduction to PostGIS
http://workshops.boundlessgeo.com/postgis-intro/
の「4. Creating a Spatial Database(http://workshops.boundlessgeo.com/postgis-intro/creating_db.html)」を参考にします。
(次のように開きます。
PostGIS ホームページ
http://postgis.net/
の Documentation ボタンをクリックします。
PostGIS - Documentation
http://postgis.net/documentation
の「Tutorials, Cheatsheets, and Books」の「Tutorial: Introduction to PostGIS」をクリックします。
Introduction to PostGIS
http://workshops.boundlessgeo.com/postgis-intro/
の「Workshop Modules」の「4. Creating a Spatial Database」をクリックします。)
Synaptic パッケージマネージャで pgAdminIII をインストールします。
1 アクティビティ -> アプリケーションを表示する(左側の一番下のアイコン) -> pgAdminIII(2面めぐらい) をクリックして起動します。
2 サーバに接続の追加ボタンをクリックします。
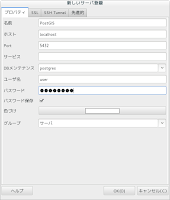
3 「新しいサーバ登録」の「プロパティ」タブに次のように入力して「OK」ボタンをクリックします。(ヒントが表示されたら「OK」ボタンをクリックします。)
名前: PostGIS(任意)
ホスト: localhost
Port: 5432
サービス: (空欄)
DBメンテナンス: postgres
ユーザ名: user(postgres ユーザ)
パスワード: ●●●●●●●●(postgres ユーザのパスワード)
(その他はそのままで)
4 ツリーを開いていくと次のようになります。
5 テーブルtokyo_kuiki をクリックして選択し、「選択オブジェクトでデータをビュー」ボタンをクリックすると属性が表示されます。
シェイプファイルのデータをインポートするには次の設定が必要でした。
6 次のコマンドで shp2pgsql-gui がインストールされていることを確認します。
nob61@deb8-vmw:~$ shp2pgsql-gui
7 「Geographic Information Systems 」の「How can I enable Shapefile GUI Loader in pgadmin3?(http://gis.stackexchange.com/questions/16181/how-can-i-enable-shapefile-gui-loader-in-pgadmin3)」を参考に、plugins.ini(/usr/share/pgadmin3/plugins.d/)の最後に次のように追加します。
user@deb8-vmw:~$ su -
パスワード:
root@deb8-vmw:~# vim /usr/share/pgadmin3/plugins.d/plugins.ini
---
;
; pgShapeLoader (Linux):
;
Title=PostGIS Shapefile and DBF loader
Command=$$PGBINDIR/shp2pgsql-gui -U $$USERNAME -d $$DATABASE -p $$PORT -h $$HOSTNAME
Description=Open a PostGIS ESRI Shapefile or Plain dbf loader console to the current database.
KeyFile=$$PGBINDIR/shp2pgsql-gui
Platform=unix
ServerType=postgresql
Database=Yes
SetPassword=No
8 「プラグイン」メニューをクリックし、「PostGIS Shapefile and DBF loader」をクリックすると「PostGIS Shapefile Import/Export Manager」が起動します。
9 「PostGIS Shapefile Import/Export Manager」の「View connection details...」ボタンをクリックします。
10 「Post connection」に次のように入力し「OK」ボタンをクリックします。
Username: user(PostgresQL の)
Password: password(PostgresQL user の)
Server Host: localhost 5432
Database: nippon
11 「PostGIS Shapefile Import/Export Manager」の「Add Files」ボタンをクリックします。
12 「Select a Shape File」でファイル(C28-13_Airport.shp)を選択し、「Open」ボタンをクリックします。
13 「PostGIS Shapefile Import/Export Manager」の「ImportList」の「Table」の「C28-13_Airport」を「airport」に変更します。
14 「PostGIS Shapefile Import/Export Manager」の「Option」ボタンをクリックします。
15 「Import Option」の「DBF file character encoding」を「SJIS」に変更して「OK」ボタンをクリックします。
16 「PostGIS Shapefile Import/Export Manager」の「Import」ボタンをクリックします。
17 「PostGIS Shapefile Import/Export Manager」を閉じて、「リフレッシュ」ボタンをクリックします。
tokyo_pgis.map に次のようにレイヤを追加します。
---
 LAYER
  NAME kuko
  TYPE POLYGON
  STATUS ON
#  DATA "C28-13_Airport.shp"
  CONNECTIONTYPE POSTGIS
  CONNECTION "dbname=nippon host=localhost user=user password='password'"
  DATA "geom from airport"
  OPACITY 80
  LABELITEM "c28_005"
  CLASS
   NAME  "Kuko"
   STYLE
    COLOR 204 255 204
    OUTLINECOLOR 0 255 0
   END
   LABEL
    MINFEATURESIZE 5
    POSITION lc
    TYPE TRUETYPE
    FONT kochi-gothic
#    ENCODING SJIS
    SIZE 8
   END
  END
 END
---
http://localhost/cgi-bin/mapserv?mode=browse&template=openlayers&layer=gyoseikuiki&layer=kuko&layer=kukokanryutsuryo&map=/home/user/mapfile/tokyo_pgis.map


0 件のコメント:
コメントを投稿