ここから準備するファイルは、ダウンロードサイトが記載されたメールの、「プログラムソースコードと共に利用するミドルウェア等」をクリックするとダウンロードされるファイル(ecommap-files-2.4.2.zip)にもあります。不具合が生じたときに対応しやすいように、こちらを使用することをおすすめします。
5-1-3 PostgreSQL と PostGIS のインストール
◆PostgreSQL のインストール
インストール手順書の「2.2.1 PostgreSQL と PostGIS のインストール」の「例 CentOS 6 系 64bit」を参考に PostgreSQL9.1 をインストールします。(インストール手順書では、PostgreSQL9.4 となっていますが PostGIS のスクリプトが正常に終了できませんでした。)「Le's postgres」の「yum で PostgreSQL をインストールしてみよう(http://lets.postgresql.jp/documents/tutorial/yum/yum)」も参考にします。
[user@centos6 ~]$ su -
パスワード:
[root@centos6 ~]# rpm -ivh https://download.postgresql.org/pub/repos/yum/9.1/redhat/rhel-6-x86_64/pgdg-centos91-9.1-6.noarch.rpm
https://download.postgresql.org/pub/repos/yum/9.1/redhat/rhel-6-x86_64/pgdg-centos91-9.1-6.noarch.rpm を取得中
準備中... ########################################### [100%]
1:pgdg-centos91 ########################################### [100%]
システム -> 管理 -> ソフトウェアの追加削除 をクリックします。
「ソフトウェアの追加削除」ウィンドウの システム -> ソフトウェアソース をクリックします。
「ソフトウェアソース」ウィンドウの一番下に「PostgreSQL9.1.6-x86_64」にチェックが付いていることを確認して「閉じる」ボタンをクリックします。
「ソフトウェアの追加削除」ウィンドウの システム -> パッケージ一覧をリフレッシュ をクリックします。
「ソフトウェアの追加削除」ウィンドウの「パッケージのコレクション」をクリックして、右側に表示される「PostgreSQL Database Server 9.1 PGDG」のチェックボックスをクリックして選択し、「適用」ボタンをクリックします。
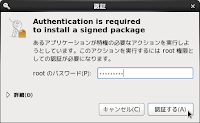
「認証」ウィンドウが表示されたら root のパスワードを入力して「認証する」ボタンをクリックします。
「端末」を起動し、rpm -qa | grep postgres と入力して PostgreSQL がインストールされたか確認します。
[root@centos6 ~]# rpm -qa | grep postgres
postgresql91-9.1.22-1PGDG.rhel6.x86_64
postgresql91-server-9.1.22-1PGDG.rhel6.x86_64
postgresql91-contrib-9.1.22-1PGDG.rhel6.x86_64
postgresql91-libs-9.1.22-1PGDG.rhel6.x86_64
◆PostGIS のインストール
ダウンロードサイトが記載されたメールの「プログラムソースコードと共に利用するミドルウェア等」リンクをクリックしてダウンロードし、解凍します。
[root@centos6 ~]# exit
logout
[user@centos6 ~]$ cd ダウンロード
[user@centos6 ダウンロード]$ ls
---
ecommap-package-2.4.2a.zip
---
[user@centos6 ダウンロード]$ unzip ecommap-package-2.4.2a.zip
Archive:  ecommap-package-2.4.2a.zip
  inflating: ecommap-package-2.4.2/Changes-2.4.2.txt
  inflating: ecommap-package-2.4.2/ecommap-installer-2.4.2.tar.gz
  inflating: ecommap-package-2.4.2/ecommap-updater-2.4.2.tar.gz
  inflating: ecommap-package-2.4.2/ecommap-updater-README.txt
  inflating: ecommap-package-2.4.2/geoserver-2.3.5-patch-webapps.tar.gz
   creating: ecommap-package-2.4.2/server/
 extracting: ecommap-package-2.4.2/server/redhat-el6.tar.gz
   creating: ecommap-package-2.4.2/server/unconfirmed/
  inflating: ecommap-package-2.4.2/server/unconfirmed/ecommap_ubuntu.txt
 extracting: ecommap-package-2.4.2/server/unconfirmed/fedora10.tar.gz
 extracting: ecommap-package-2.4.2/server/unconfirmed/redhat-el5.tar.gz
[user@centos6 ダウンロード]$ cd ecommap-package-2.4.2/server/
[user@centos6 server]$ ls
redhat-el6.tar.gz
unconfirmed
[user@centos6 server]$ tar zxvf redhat-el6.tar.gz
redhat-el6/
redhat-el6/install_yum_postgresql.sh
redhat-el6/pg_hba.conf
redhat-el6/postgis_proj4text_patch.sql
[user@centos6 server]$ cd redhat-el6
[user@centos6 redhat-el6]$ su
パスワード:
[root@centos6 redhat-el6]# sh install_yum_postgresql.sh
---
            postgis_version
---------------------------------------
 1.5 USE_GEOS=1 USE_PROJ=1 USE_STATS=1
(1 行)
最後に上記のように表示されたので、インストールは正常に完了しました。
◆PostgreSQLの設定の変更
/var/lib/pgsql/9.1/data/postgresql.conf を次のように修正します。
[root@centos6 redhat-el6]# vim /var/lib/pgsql/9.1/data/postgresql.conf
---
listen_addresses = 'localhost' #コメントを外す

port = 5432 #コメントを外す
max_connections = 256 #100 -> 256
---


0 件のコメント:
コメントを投稿