HTML ファイルを新規作成します。
「openlayersTokyoproj」 を右クリックして 新規 -> HTML ファイル をクリック。
「HTML ファイル」ウィンドウの「ファイル名(任意:openlayers_attribution.html)」に入力して「完了」ボタンをクリック。
「charset」を「utf-8」にします。
「examples」の「Attribution.html」の内容をコピーして新規作成したファイルに貼り付けます。
コードの修正とちょっと解説します。
<html xmlns="http://www.w3.org/1999/xhtml">
 <head>
  <meta http-equiv="Content-Type" content="text/html; charset=utf-8">
  <title>OpenLayers32 Attribution</title>
  <link rel="stylesheet" href="./theme/default/style.css" type="text/css" />
  <link rel="stylesheet" href="./examples/style.css" type="text/css" />

<!-- OpenLayers ライブラリ -->
  <script src="./lib/Firebug/firebug.js"></script>
  <script src="./lib/OpenLayers.js"></script>

<!-- Proj4js ライブラリ -->
  <script type="text/javascript" src="./lib/proj4js/lib/proj4js-compressed.js"></script>
  <script type="text/javascript" src="./lib/proj4js/lib/projCode/tmerc.js"></script>
  <script type="text/javascript" src="./lib/proj4js/lib/defs/EPSG2456.js"></script>
<!-- attributions のコード -->
  <script type="text/javascript">
   var map, measureControls, layer1, layer2, layer3;
   function init(){
//  map = new OpenLayers.Map('map');
// 東京都用 map の設定
    map = new OpenLayers.Map('map', {
     projection: new OpenLayers.Projection("EPSG:2456"),
     displayProjection: new OpenLayers.Projection("EPSG:4326"),
     maxResolution: 'auto',
     units: 'meters',
     maxExtent: new OpenLayers.Bounds(-279000,1054000,-185000,1104000)
    });
// ここまで
// ここから追加
    layer1 = new OpenLayers.Layer.WMS( "Tokyo Height WMS",
     "http://192.168.1.6/cgi-bin/mapserv?",
     {
      map: '/home/user/mapfile/tokyo_bmi_pgis_img.map',
      layers: 'height',
      format: 'image/png'
     },{
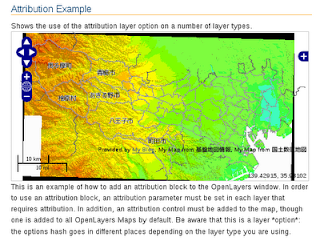
      attribution: 'Provided by <a href="http://nobmob.blogspot.com/2009/11/openlayers-32-attribution.html">My Blog</a>' // 追加
    });

    layer2 = new OpenLayers.Layer.WMS( "Tokyo Kukaku Sen WMS",
     "http://192.168.1.6/cgi-bin/mapserv?",
     {
      map: '/home/user/mapfile/tokyo_bmi_pgis_img2.map',
      layers: 'kukaku',
      transparent: true,
      format: 'image/png'
     },{
      attribution:"My Map from 基盤地図情報" // 追加
    });

    layer3 = new OpenLayers.Layer.WMS( "Tokyo Gyoseikai mlit WMS",
     "http://192.168.1.6/cgi-bin/mapserv?",
     {
      map: '/home/user/mapfile/tokyo_pf_pgis.map',
      layers: 'gyoseikai',
      transparent: true,
      format: 'image/png'
     },{
      attribution:"My Map from 国土数値地図" // 追加
    });

    map.addLayers([layer1, layer2, layer3]);
// ここまで
    map.addControl(new OpenLayers.Control.LayerSwitcher());
    map.addControl(new OpenLayers.Control.Attribution());
    map.addControl(new OpenLayers.Control.MousePosition()); // 追加
    map.addControl(new OpenLayers.Control.ScaleLine());     // 追加
    // map.setCenter(new OpenLayers.LonLat(0, 0), 0);
    map.zoomToMaxExtent();
   } // End of function init()
  </script>
 </head>
 <body onload="init()">
  <h1 id="title">Attribution Example</h1>
  <div id="tags">
   copyright watermark logo attribution
  </div>
  <p id="shortdesc">
   Shows the use of the attribution layer option on a number of layer types.
  </p>
  <div id="map" class="smallmap"></div>
  <div id="docs">
   This is an example of how to add an attribution block to the OpenLayers
  window.  In order to use an attribution block, an attribution parameter
  must be set in each layer that requires attribution. In addition, an
  attribution control must be added to the map, though one is added to all
  OpenLayers Maps by default.
   Be aware that this is a layer *option*: the options hash goes in
  different places depending on the layer type you are using.
  </div>
 </body>
</html>

Attribution の説明の訳
これは、attribution ブロックを OpenLayers のウィンドウに追加する方法の例です。attribution ブロックを使うために、attribution パラメータは、attribution を必要とする各レイヤーに設定する必要があります。加えて、attribution control は、map に追加され、それにより、デフォルトですべての OpenLayers マップに追加されます。
これがレイヤ *オプション* だとということに注意してください。:オプションのハッシュはレイヤの種類に応じて別の場所に入ります。

0 件のコメント:
コメントを投稿